A Beginner step towards Alibaba Cloud OSS (Object storage services)

Objective: In this post, we, try to understand what is Object Storage Service in Alibaba Cloud and how to create your first Object Storage Service. We will try to understand the different business scenario where we can utilize this OSS service.

Prerequisites: The first and most important requirement is that you should have Alibaba Cloud account handy with you.

Now, as we are pretty much clear with the objective of the post and perquisites so, let’s understand what is OSS (Object Storage Service).

As the name suggest OSS (Object Storage Service) is the API service provided by Alibaba Cloud to Store different objects. It is one of the famous and unique storage services. You can store any object, any amount of data. The object can be anything which can be store for frequent access or backup or Archive any purpose.

Now, let’s understand this by different Business scenario , suppose you are running a shopping cart project where you have lots of images of the products then those images can be upload in OSS and one of the great feature which you will not find any other Cloud Storage service is that you can do image processing as well at runtime without writing a single line of code.

Similarly, You can store your shopping cart’s invoice backup or data backup. Or If you are doing any signing agreement with your dealer of sub-dealer then the singing contract pdf, image, etc can be stored in OSS.

Now, before going Alibaba Cloud Console let’s understand some other terms or properties to understand OSS

KeyTerms

Bucket:- The first and most important term is Bucket. So, whenever you create an OSS you generally create a Bucket where you are going to store Objects.

Storage class:- Storage class you can think like usage of object access frequency there are 3 types exists in Storage class

  • Standard:– Standard like the object which you saved in the bucket can be used frequently. For example, if you have Instagram like the site then the images can be saved in Standard class account.
  • Infrequent Access:- This you can think like a life cycle to store the object is high but it will be accessed infrequently. Means, not very often. Although, there is a minimum storage duration limit is 30 days.
  • Archive:- As the name suggests it is just for storage purpose only. The chances to access this object is very rare. Similar to the IA class, Archive has a minimum of 60 days storage duration.

Now, You can think the above classes type like Hot & Cold access. Now, depending upon the accessibility and storage the charges will vary.

Region: Now, the region is like a geographical location where the object primarily saved and access. Alibaba cloud has various region available.

End Point:- The endpoint is nothing but the URL (Domain Name) by which the service will be accessed by us.

Access Key: Access key is nothing but Access key ID and secret. which ensure the service is accessible by an HTTP request.

Below are some of the features

  • High availability 99.999999%
  • No storage Limit
  • Hight throughput and low – latency access performance (although for Archive Latency can be in Minute for other classes it is in MS)
  • Support HTTPS
  • We can process images as well (except archive class)

Accessibility of Storage: We can access the storage by following ways

  • https URL
  • SDK (we can use different programming language)
  • OSSBrowser (A Graphical tool to access OSS just assume like file browser)
  • OSSCLI ( Common Line Interface tool)
  • OSSFs (Is tool to mount storage to your Local File system which you can access like any other drive)

Now, without wasting the time we are going to see how to use OSS. Let’s start step by step

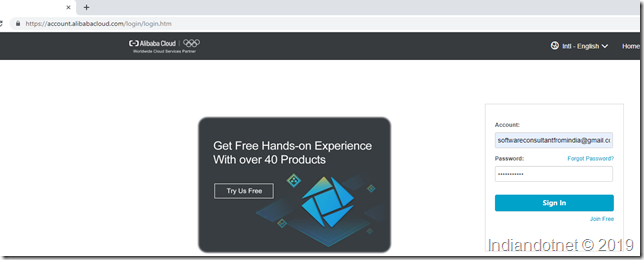
Step 1:- Open https://account.alibabacloud.com/login/login.htm and provide your valid username and password.

Indiandotnet_OSS_Login

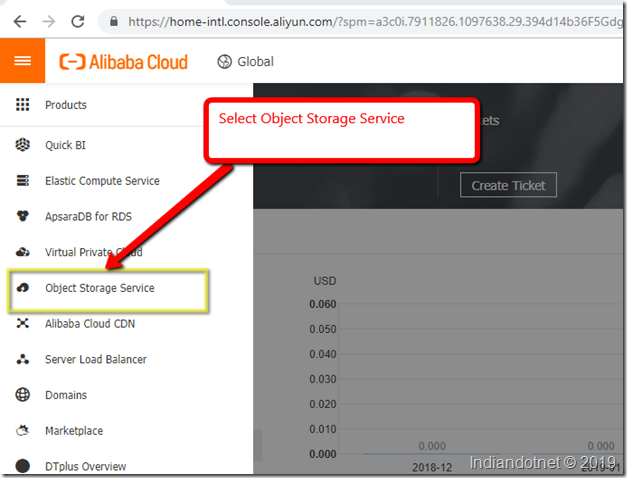
Step 2:- After Login click on Console option on the top. You will get the following screen. Where you have to select Object Storage Service

Indiandotnet_OSS_Console_2

Step 3:- After clicking the OSS you will get Dashboard. Which give you the option to create new Buckets, see existing buckets and bandwidth /Storage consumed so far.

OSS_Dashboard_Indiandotnet_3

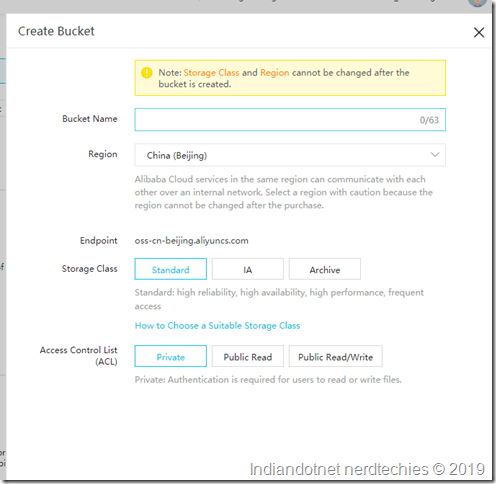
Step 4:- As we need to create a new Bucket to click on Either + symbol on the Left side or option create a bucket on the right side.

OSS_Create_Bucket_Indiandotnet_4

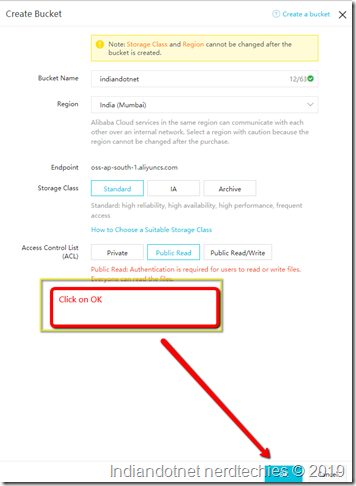
Here you can provide the unique bucket name provide the region, storage class and Access Control List as per your need. Once you filled the details click the OK button as I did in the following screen

Create_Bucket_Indiandotnet_5

Step 5: After clicking the OK button our first Bucket is created with the name “Indiandotnet”. You will see different details and option.

Indiandotnet_Bucket_6

Step 6:- Here, we will click on the Files tab.

OSS_File_Option_7

We can see a different option like Upload, create Folder, etc. Just below to that we have existing uploaded files detail.

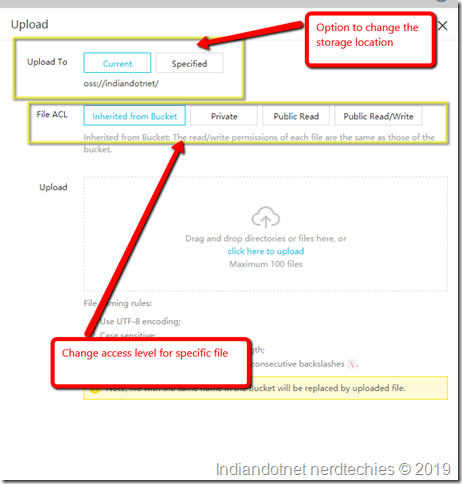
Now, let’s try to upload a file by clicking upload button available on the screen.

Step 7:- This is the best part which you will agree. We can upload the file either on the root or any specific folder. Apart from this, we can control the Access of the File from private, public read, public read /Write

Upload_File_Option_Indiandotnet_8

Step 8:- Just upload any file you want. After upload, you will find the file details in the grid as shown in below screen.

Uploaded_File_List_Indiandotnet_9

Step 9:- Here, when you click on More option next to the file row you will find a context menu with different option as shown in below screen. We will discuss those option later but for current interest just click on Copy File URL.

Indiandotnet_OSS_File_Different_Option_10

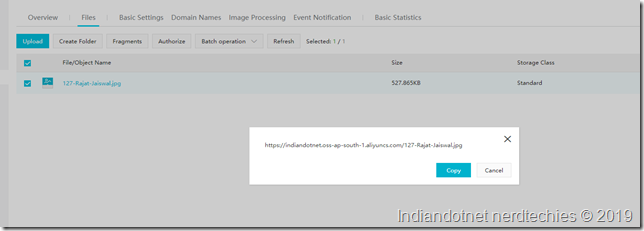
Step 10: When you click on Copy File URL you will get URL of the file as shown in below screen. Just copy the URL and access the file.

Indiandotnet_Copy_URL_Option_11

So, After reading the above steps and details you will be able to answer the following questions

What is OSS (Object Storage Services)?

What are the Key terms Of OSS?

How to Create our First OSS?

How to Access your file using HTTPS URL?

In the next few posts, I am going to describe some more tips which will be helpful to answer

How to process uploaded image at runtime? a very exciting and unique feature which I doubt supported by any other cloud provider.

How to access the storage programmatically via C#.

Please, provide your inputs on this post and wait for a few exciting posts related to Alibaba cloud Object Storage Service.
Indian Prime Minister 2019 Live Poll – Analysis using Microsoft Form, Microsoft Flow and Power BI Live

This is currently, the hot topic in India who will win the 2019 election of India and become Prime Minister. Although, 90% of people know who will come again Smile.

This subject gave me an opportunity to use my favorite tools Microsoft Flow, Power BI, and Microsoft Form.

Our aim is here to create a flow which is responsible for capturing the response from Microsoft Form and send it to Power BI stream dataset.

Or we can say the give live stream response of Microsoft form using Microsoft Flow to Power BI and show live trend dashboard by passing stream data to Power BI.

Isn’t it interesting?

I am so excited So, let’s get started.

Prerequisites: Surely, you need the following the account to work further

1. Microsoft flow:  You need Microsoft Flow account for this you can use http://flow.microsoft.com/ to create an account.

2. Microsoft Power BI: You need Microsoft Power BI account for this you can use  http://app.powerbi.com/ to create an account.

3. Microsoft Form:  You need Microsoft Form account for this you can use https://forms.office.com/ to create an account.


Indiandotnet_Microsoft_Form_1

All good now you have all the required tools.

The first step here is to create a form so, just log in to Microsoft Survey form and create a sample Survey form as shown in below figure.

Indiandotnet_Microsoft_Fom_2

Great, so we have created our Microsoft Survey form which you can access via the link

Indiandotnet_Microsoft_Form_3

Here, as mentioned in the image make sure you click “Anyone with the Link can respond” to make it publicly available.

Great, so far so good we have created our first step.

Now, Move to Microsoft Flow and after login, create a New button and choose to create blank flow.

Indiandotnet_Microsoft_form_flow_4

In the next step search Microsoft Flow as shown in below figure. We want to collect the response. So, whenever a new response is submitted our flow with the trigger.

Indiandotnet_Microsoft_Form_Flow_5

Now, when you click on “When a new response is Submitted”option (if you are already login into Microsoft form) it will show all the forms which you have created.

As shown in the figure, we are selecting “Indiandotnet- Prime Minister 2019 of India”

Indiandotnet_Microsoft_Form_Flow_6

Here, as we know there can be a bunch of response submitted using the form.

So, we need to capture each individual response and send to power BI stream database. For this, we will add Apply to Each  option and in that select Get Response detail in the action

Indiandotnet_Microsoft_Form_Flow_8

Now, in the next step we will configure it as shown in the below figure. so we are going to pickup each individual response.

indiandotnet_Microsoft_form_flow12

So, our first step is created.

Now, we need to pass the submitted response to Power BI but before that, we have to create a Streaming dataset as we created in our earlier post as well.

Login to app.powerBI.com and create a stream dataset in your workspace as shown in below figure.

Indiandotnet_Microsoft_Fow_Power_BI_8

After clicking the streaming Dataset as shown in above figure select the API option

Indiandotnet_Microsoft_Flow_Power_BI_9

Now, in the next step, we will define the dataset in which we will have the same fields which we are capturing in the form.

In our example, we captured 2 questions which are

1) your Prime minister

2) your location

Just define the fields as mentioned above. You can see I have created the same as shown in the below figure.

Indiandotnet_Microsoft_Flow_Power_BI_10

Just click on Create button to proceed further

Indiandotnet_Microsoft_Flow_Power_BI_10

Once, you created the dataset in the next step we will create a dashboard. Although, we don’t have any data yet, but can at least define.

Just, create a report by clicking the option as shown in the below figure.

Indiandotnet_Microsoft_Flow_Power_BI_12

When you click, create report option you will get report editor here we are choosing 2 simple graphs

1) Bar Graph  – which will show no of votes for each individual candidate (an option which we gave in the Microsoft form)

2) MAP – from where we got the response across the globe.

Indiandotnet_Microsoft_Flow_Power_BI_13

Now, we are done with the Power BI stream database move back to Microsoft Flow and configure the next step which we left.

Here, we are going to add Add rows to a Power BI dataset as shown in below figure

Indiandotnet_Microsoft_Form_Flow_10

Now, just configure the Power BI as shown

Indiandotnet_Microsoft_Form_Flow_11

so far so good, we are done with our configuration. Just save the Flow and hit test run.

and you will see all steps are clear. Now, check the Power BI dashboard which we have created.

Indiandotnet_Nerdtechies_flow_14

After configuring correctly, just publish the Survey and let the people fill it.

I did the same and shared the survey on Facebook.

Now, let’s move to power bi dashboard and check the graph there.

Wow, we are able to see all the live response.

Indiandotnet_Microsoft_Flow_Power_BI_15

People voted from different locations to their Primary Minister and as you can see Shri Narendra Modi is our favorite and all the people voted for him.

Please, let me know how you like this post.

Enjoy learning & Sharing Microsoft Flow, Microsoft Form & Power BI


A humble request to all the readers who are Indian and eligible to vote. Please, do cast your vote. Your vote is very important.

Choose, a capable leader in this election whom you can trust that he can speak your voice logically.

India will progress there is no doubt but choose a leader who will be with India not with terrorist and tukde tukde gange.

JAI HIND

BHARAT MATA KI JAI

MebhiChokiDAR – Tweet sentiment analysis and more using Microsoft flow

Microsoft Flow provides various templates to achieve your goal and Twitter Sentiment analysis is one of them.

In this tutorial we will see how to do sentiment analysis using few clicks and see live graphical representation using Power BI live feed.

As in India currently, #Mebhichokidar has tag is very viral. So,we are using this hashtag to cross check how it is going.

Prerequisites :

There are 3 basic prerequisites to complete this task

1) You should have Microsoft flow account if you don’t have that then you can create via link https://flow.microsoft.com

2) You should have Microsoft Power BI account if you don’t have then you can create via link  https://powerbi.microsoft.com/en-us/

3) You should have  Microsoft Azure Portal account for cognitive services if you don’t have then don’t worry you can create via link https://Portal.azure.com

Once, you have all the 3 accounts available then proceed step by step as suggest below

Step 1:-  Just open the Microsoft flow and select the template “Run Sentiment Analysis on tweets and push Result to a Power BI dataset” as shown in below figure.

Indiandotnet_Twitter_1

Step 2: When you select the option you will find below screen as shown in below

Indiandotnet_Twitter_2

Step 3:-  We have to configure 3 connection as expected  text analytics connection (Azure cognitive service) , Power BI (live dashboard) connection and last but not the least Twitter connection.

Here, As I am using an office 365 common account so my power BI already authenticated using that.

Indiandotnet_Twitter_3

Step 4:- Now,let me connect with My twitter account first. Which can be done by clicking Sign In.  In this you need to authorize the flow to access your twitter account.

Indiandotnet_Twitter_6

Step 5: In the next step you have to define text analysis connection for which you have to first login into Azure and search for cognitive service. If not exists then create  by clicking Add  button

Indiandotnet_Cognitive_Service

When you click add button you will find below link as you can see. Search Text Analytics and select the option highlighted as below

Indiandotnet_Cognitive_Service_2

Provide proper Resource Name and select  pricing tier as per your convenient. I am choosing free tier for this example.

Indiandot_Net_Vision_API_1

Step 6: Once you created the account. You need to copy the Key from Get your Keys option . and copy the Web API option from 2b as shown in below.

Indiandotnet_Cognitive_Service_3

Step 7: So, far so  good , we have created cognitive service and now moving back to Microsoft Flow  and Configure the Text analytics. Give any name in connection name and provide Account key which we copied earlier and also copy the Web API.

Indiandotnet_Twitter_4

Step 8:  Now, we are done with the connection next step is configure the steps. So, when a new tweet is posted we will provide that tweet to our Cognitive service using detect sentiment which will provide  sentiment score. The sentiment score will be given to Power BI.

Indiandotnet_Twitter_8

Step 9:   Now, click on twitter option here you can add multiple text option. For example you can see in below search text we have added NarendraModi, Chokidar or MaybheeChokidar

Indiandotnet_Twitter_9

Step 11:- Now, delete Detect Sentiment action  and add again by searching the sentiment 

Indiandotnet_Twitter_10

Step 12:  Here we will configure the sentiment option as you can see. We are giving  Tweet Text and Language (we are selecting  English Language)Indiandotnet_Twitter_13

Indiandotnet_Twitter_11

Step 13:-  Now, in the next step  we will configure the Power BI.  For which we will login http://app.powerBi.com  and click on  Streaming Dataset option  because we are  going to providing .

Indiandotnet_Twitter_12

Step 14:  Now, click on API as shown in below image.

Indiandotnet_Twitter_14

Step 15: Now, define the dataset as shown.  below here we are defining the fields. So, in the fields we are adding SentimentScore (which will given by cognitive service) , TwitterDate (when tweet posted), username (who posted the tweet),  tweetText (What is the tweet)

Indiandotnet_Twitter_15

Once, you define the dataset click on Create.

Step 16: Now, save the Report and configure the report as per your need.

Indiandotnet_Twitter_16

Step 17: Here now configure, Power BI dashboard and remove the payload. as shown in below figure.

Indiandotnet_Twitter_17

Step 18:  See the below configuration which configured.

Indiandotnet_Twitter_18

Here if you see, we defined workplace which we have created and dataset defined just above and mapped the fields.

Indiandotnet_Twitter_21

Step 19: Now, Save  the  flow and configuration and try to run it. If everything works perfectly. You will get all the checkbox.

Indiandotnet_Twitter_20

Step 20: Now, you can see the Power BI dashboard you will get the graph updating per minute with the new tweet text whenever a post with specific tag.

Below you can find sentiment score  graph.

Indiandotnet_Twitter_22

In Next post I will share the detail of this sentiment analysis data.

Hope you might like this easy way of sentiment analysis.

Happy learning.

How to start with Microsoft flow ?

Dear Friends,

Microsoft Flow is one of the hot product nowadays and it is not new. It is in the industry from the last few years. In this article, we will try to explore Microsoft Flow and know how it can be helpful to you with an example.

I have changed my writing style in this blog to resolve all the question which you might have if you are new to Microsoft Flow.

What is Microsoft Flow?

Microsoft Flow as the name suggests it helps in building the workflow to resolve business problems or we can say that It helps to automate workflow to resolve business needs or problems. It is basically part of the Microsoft Office 365 suites and mainly created to Business users or Business Analyst to solve or automate their business needs without having knowledge of different programming language like Java C# etc.

It makes you smarter to solve your problem with doing automating the steps. It is a graphical based tool to design flow to resolve any problem.

What are the different scenarios where I can use Microsoft Flow?

Now, you might be thinking of where you can use this. below are several business scenarios where we can use flow.

Examples :-

Email or Mobile Notification

Suppose, you are a marketing team head and you want a notification on your mobile whenever any new lead is generated, then in this case Microsoft Flow will help you.

Folder Watcher

Suppose, you are working on Printer server and your task is to continue watch files in a folder and if any new file arrived in that DropBox folder then you have to print it and share in the email to the XYZ person, then in this case also you can use flow.

Data collector

The other example is to dump the twitter data in your database. For example, you want to monitor what are the different tweets are coming on your newly launched product or product features so you can analyze the sentiments.

Streamline approval
your employee added a Leave request in your portal then Flow will send an email to the manager and as a manager you can approve or hold or cancel that request either directly from outlook message of from Flow itself as per your decision the result will be updated in your portal and a notification email sent to requester employee.

There might be tonnes of examples, or situations where we can use Microsoft Flow to automate and ease our work.

How it is different from Logic Apps?

Now, as you might have gone through my previous blogs and you might be thinking it is just like Logic Apps. So, my answer is yes, it is same as Logic Apps because it is created on top of  Logic Apps. but there are various different points where it differs from Logic Apps.

Below are some of them.

1. Flow is Office 365 suits part and an Individual application for which you don’t need Azure Subscription but for Logic Apps you required Azure Subscription.

2. Flow is developed for Business users /Business Analyst so, you don’t need to write complex code or modify the existing thing use Visual studio to enhance or create but Logic Apps is mainly for developers or people who have programming knowledge so if may require they can change the visual studio code.

What is the first step to start Microsoft Flow?

To start the flow you need to sign up on website https://flow.Microsoft.com. If you are office 365 users then you can sign in with that account or use any other email like Hotmail, outlook to sign up.

Now, you might be thinking about the pricing. There are 3 different plans available, free, Flow Plan1,  Flow Plan 2. depends upon your need you can choose any plan.

Indiandotnet_Microsoft_Flow_Price

Once you opted the plan and sing In after login you will get following home screen to proceed further or we can say this would be your play area where you can create different flows.

Indiandotnet_Flow_Home

Just, make you aware there are various predefined templates available which are created based upon various frequently business needs

Indiandotnet_Flow_Template

How does it work?

Now,  as mentioned earlier it is most likely Logic Apps. So, similar to Logic Apps it has the various connector.

Just think if the concept “if something happened then we have to do something”. So, basically this is based on Trigger and then Action. concept.

Example, An email came to your inbox (Trigger) then (Action) send a mobile notification.

There are more than 200+ connectors available to help you and ease your work.

Indiandotnet_Flow_Connection

Can we have a step by step example to try it out?

Yes, and believe me this is one of the important examples for all the blogger and they will surely, like it.

For a blogger the challenge is promoting his/her post and for which he/she needs to create a shorten URL either on (goo.gl or bitly.com)  and then share on Facebook, Twitter or other social media channel.

Now, this is again a time-consuming process. Now, what you think if we can automate this process.

So, our challenge is whenever a new post is added in the blog then our flow identify that trigger and then provide that link to bitly.com and create a short bitly link and then post the generated link to social media (but in this example I created the notification to make it short and sweet choosing existing template ).

Now with the assumption, you already created your account in the Flow and logged in successfully. we proceed further.

Let’s follow the step here

Indiandotnet_Flow_WordPress_Step_1

Step 1: A an existing template “When a post is created in ”WordPress create a Bitlink URL and send the notification” as shown in below figure.

Indiandotnet_Flow_Wordpress_2

Step 2: Now, as you can see we have to configure the btily authentication and allow Microsoft Flow to access bitly.com to create URL. as shown in the figure.

Indiandotnet_Wordpress_step_3

Step 3:- Once you allowed it.  in the next step, we have to give authentication and authorization to access our WordPress blog. So, whenever a new post came flow will identify. so, just provide access as shown in the below figure.

Indiandotnet_wordpress_Step_4

Step 4:- so far so good we have given authorization for bitly & our WordPress blog.  we don’t need to configure the next step because it would be automatically configured. Now, we are good to go. we have configured perfectly in a few clicks, just save the Flow and check the flow using flow checker option.Indiandotnet_flow_test_Step

If there is no error you found in Flow Checker just click the Test option as shown in below figure.

Indiandotnet_Flow_Office_Step_8

Step 5: Now, go to your blog and create a post and publish it. You will be surprised that your flow automatically identified the new post and created a short URL and notify you as well.

You can see all the flow steps are checked it means the flow is successful.

indiandotnet_Flow_WordPress_11

Step 6: Now, you can check bitly.com and you can find the URL is created and also you got the notification.

Indiandotnet_Flow_Wordpress_12

Step 7: You can check each step detail as well by clicking the object

Indiandotnet_Flow_WordPress_Step_13

So we are good with the flow example.

Please, share your input on how you like the flow and this post  Smile

Happy learning

A simple way to check vulnerability status of your SQL SERVER database

As a product owner, you always worried about the different security aspect of your application and SQL Server Database is one of the main important parts for which you might worry.

And you always think there should be some kind of checklist which you or your team have to check whether your database is secure or not and find all the vulnerabilities.

And obviously you might have purchased different tools to this assessment as well who will provide you security loopholes but when we talk about Database the option is limited and some options are very costly.

With SQL SERVER 2017 latest  SQL Management Studio your one of the problem will be resolved cross-check your database vulnerability.

You heard it right. Although, this feature is already available in SQL Azure but now you can do this assessment of your database using SQL Server 2017’s  management studio.

This vulnerability assessment report can be generated on the database with few simple clicks and you will get different High, Medium , Low risks of your database.

The vulnerability assessment report not only provide risks details but also help you to identify which category  of it and this will not stop here you will get a recommendation as well to fix those problems. Sometimes , you will get direct scripts which you can run to fix those issues and sometimes you will get the links on how to implement those.

Let’s understand this by step by step action.

Before starting to make sure you have SQL Server 2017  Management  Studio’s latest version.

Step 1: Once you opened the SQL Server management studio right click on the database which you want to cross check.  in this example, I am using the AdventureWorks database. As shown in the below figure.

Indiandotnet_Vulnerability_Assessment_1

Here you have 2 options either Scan for Vulnerabilities or Open Existing Scan

Step 2: Now, as we are doing it the first time so click on Scan for Vulnerabilities option. and you will get the following screen where you can provide the location of scan file.

Indiandotnet_Vulnerability_Assessment_2

Step 3:-   Just click on OK button to proceed further and wow you will get all the loop holes of your database.

You can easily check what are different points on which your Database is failed with risk Assessment.

Indiandotnet_Vulnerability_Assessment_3

As shown in the above figure , we have 6 check points on which our database failed  in which 1 is on high risk , 3 medium risk  and 2 Low risk.

And if you see carefully there are different categories as well like data protection, Authentication and Authorization, Surface Area Reduction etc.

Here as the name suggest Data Protection is mostly related to encryption of your sensitive data like SSN, DOB etc or TDE.

Authentication and Authorization  is more relation to login access of the database.

Surface Area reduction  is more related to what extra option you have opened .

Step 4:- Now, move a step further and click on any row in the grid. You will find the details of the row just below the grid. As you can see in below image when we click on data protection it suggesting the column names which come under extra care and to on which we might think to apply encryption.

Indiandotnet_Vulnerability_Assessment_4

Step 5:-  The story does not end here, for some of the problems this assessment report provides script as well and if the script is not possible then provide a reference link to resolve that issue.

As you can see in below screen we are getting recommendation scripts to apply.

Indiandotnet_Vulnerability_Assessment_5

Isn’t it cool and simple to assess your database’s vulnerability in a few clicks and secure your database?

Share your thoughts.

Happy learning !

Azure Logic APPS–A simplest way to Automate your Business Process

As you may aware Microsoft Azure provides you a bunch of services, feature and Azure Logic Apps is one of the best Service which Microsoft provides to automate, orchestrate tasks, business process etc.

Logic Apps is the simplest visual designer solution to solve your simple to advance problem without writing a complex logic.

Indiandotnet_Microsoft_Logic_App

I know you might be thinking where we can use this. So my answer is everywhere in your business where you might need some kind of automation. Let’s understand the need with a few examples here.

Example:- Suppose, you are a business owner and most of the customer contact you via email. So, whenever a mail comes with subject invoice or new order you read those email carefully and depending upon the the subject you either send then to Account department  or Production team moreover if the email is coming from new client then you add his basic details in your system and once the production team update status of work complete and notify you. You again send the completion confirmation to end client.

Now, all these processes which we have gone through are in the different system and most of them required human interaction, for example, identifying the new client and firstly make their entry in the system.

So, this whole process can be automated using Azure Logic Apps.  So, in the above problem, Azure Logic Apps firstly read your email and identify the specific subject’s email. Once those identify check the email address in your client repository whether that exists or not if not exists then will add in the client repository.

In the next step, Logic Apps send detail to the production team or Account system. Also, keep eye on the database of the production team and when they trigger order complete send an email or SMS to end client.

And believe me, all this complex logic you can achieve in Logic Apps without writing complex code but using designer object provided in Azure logic Apps.

One more thing which I have faced personally if you worked  in supply chain system especially E-Pedigree, EPCIS & EDI then you might need to work on complex XML, AS2 format files for which you have to write complex code but with the help of Logic Apps this can be few steps job  and without writing any complex code.

Few more example like

1. Connect with Facebook and find the negative post and remove from your wall.

2. Fetch Tweets and  either retweet or find the sentiment

3.  Fetch newly added detail from SQL Server/ CRM/ Sales Force and send a welcome SMS or Email.

There are tones of the example where Logic Apps workflow makes your life easy.

Let’s understand the main component of Logic Apps which is a Connector.

These connectors will help you to connect with various API, protocols, integration account and enterprise account connector.

Now, to proceed further let me tell you there is more than 200 connector (predefine components) available to help you in achieving your goal.

connector

Every connector   has two main parts which are Action & Trigger

By the name, it is clear that Action is the action item needs to be taken and Trigger will help us to define when to take the action.

Now,  Lot’s of theory here let’s understand this by a step by step simple example. The problem statement is whenever an Email comes to our Office 365 account we will create a file in Dropbox and the file will content the email body. Isn’t it cool?

Prerequisites:- The first and most important prerequisites here is that you should have Microsoft Azure portal Account.

Step 1: Login to Microsoft Azure Portal  https://portal.azure.com/  using your credentials

Step 2: Once the login is done the next step is to click on All services and find integration option when you click on that option you will get Logic Apps option as shown in below figure.

Logic_Apps_1

Step 3: When you click on the Logic Apps option you will get the following screen. Here if you have not created any Logic Apps earlier then the grid will show blank. So just click on Create Logic Apps option or Add button

Indiandotnet_Logic_Apps_2

Step 3:-  You will get the following screen after using Add new Logic Apps option. Where you need to provide your application name and select the subscription, and use the existing resource group or create new. At last, need to select the location where to deploy the app. Once you are done with this just Click on Create button in the bottom of the screen.

Indiandotnet_Logic_App_3

Step 4: – Now, it will take a few minutes to complete and you will get following notification that application is deployed.

Indiandotnet_Logic_Apps_4

Step 5: Now open this application by going back to Logic Apps Resource Grid or Pin the Application on Dashboard by clicking Pin To Dashboard option and open from Dashboard.

Indiandotnet_Logic_App_5

Step 6:  Now when you click on open you will following screen. Where you can choose any predefined template which fulfils your business needs. But in this example, we are taking option Add new Logic App and proceed further

Indiandotnet_Logic_Apps_5

Step 7: You will get the following screen after clicking New Logic Apps option.

Indiandotnet_Logic_Apps_6

Step 8:  Now when you click on Connector you will find there is various connector available which you can choose. In this example we are taking Office 365 outLook email connector

Indiandotnet_Logic_Apps_7

Step 9: When you click on OutLook option you will get a new screen where you will find the different trigger on which you want to take action. To make this example simple we are choosing the option when a new Email Arrives

Indiandotnet_Logic_Apps_8

So, it means whenever a new Email comes to the outlook we will do something. Now when you click on When A new Email Arrives it will ask you Outlook credential

Indiandotnet_Logic_Apps_9

Step 10:  Give proper credentials and allow the Logic Apps to access Office 365 email.

Indiandotnet_Logic_Apps_10

Step 11:-  Once you allow Access then you will get the following screen where you need to define the different option value. For example how frequently mail need to be check etc

Indiandotnet_Logic_Apps_11

Step 12:- Now, what we need to do here, whenever a new mail found we will create a file in Dropbox. So just add Create a file in dropbox connector for next step.

Indiandotnet_Logic_App_Drop_Box_Finding

Step 13: As obvious, you have to provide drop box access to Logic Apps to further action. So, just press the allow button.

Indiandotnet_Logic_App_Drop_Box_Access

Step 14:-  Once you authorized in the next step you have to configure the dropbox like where should we save file folder path in the current example we are saving the file in root folder.

Next what is the file name so, we are creating email subject as the file name. and to view it properly we will append the extension HTML in the filename.

Next property is file content, so we are going to save email body (email content) in the file.

Indiandotnet_Logic_Apps_Dropbox_Setting

You can configure the properties as per your ease.

Indiandotnet_Logic_Apps_DropBox_Settings

Step 15: Just save the Logic Apps and  hit the run button to test it further

Indiandotnet_Logic_App_Hit_Run_Button1

Step 16: To make sure it is working properly, we are going to send an email from my personal Gmail to my office 365 account

Indiandotnet_Logic_Apps_Email

Step 17: Now, once we send this email to my office 365 account. The logic app should create a new file in my dropbox. As you can see in below figure it showing WOW Azure Logic App.html as expected.

Indiandotnet_Logic_Apps_Dropbox_View

Step 18: Now, we will try to open it and check the content of the file and WOW, it is working as per our expectation.

Indiandotnet_Logic_Apps_File_Conent

So, we have created our first simple Azure Logic App without writing a single line but handled a complex logic.

In my next few post, we will see more inside of Azure Logic Apps.

I hope you may like this post.

Happy learning.

web scraping for analysis using the Microsoft Power BI tool

Whenever we talk about web scraping or web data extraction we always think it would be a difficult part and trust me to exact HTML code and fetch what is needed is a bit complicated not an easy task.

But Power BI made it very easy to extract data on which we can do the analysis.

Let me take an example here, suppose we want to create a tool which extracts data from different shopping site and compare them to get the best deal of particular product.

This extraction of the data and comparison can be easily done in a few steps in Microsoft Power BI.

Let’s understand it more using hands on using few steps as mentioned below in this post.

In this example, we are going to extract data from Amazon.in web site

Step 1:-  Open web data source and provide the URL of the web page from where you want the data. As shown in the below figure we are going to extract data from below URL

https://www.amazon.in/gp/goldbox?ref=nav_topnav_deals

import_data_from_Site_1

Step 2:  When you click on OK button you will get a new popup windows in which power BI tried to extract the data and provided you tables as you can see in below image there are two tables which Power BI provided Document & Table 0.

import_data_from_Site_2

but when you view those table you didn’t get any fruitful information. So , Power BI has a feature  to extract the data as per your requirement for that you have to click on the Button “Add table using Example”

Step 3:- After clicking the button you will get a new popup screen as shown in below image.

You can see there are 2 parts in the popup the first part is the web part view and you can see  the page from where we want to extract data is visible here.

The second part is table structure which we are going to create by giving a few example to Power BI.

import_data_From_Site_3

Step 4:- Now, Here we have to extract the Product Name, Price and percentage offer. So we are going to train the Power BI with 1 or 2 example. So , Let suppose Column1 will hold the Product name . As we can see the product Name in the web page is “Kevin 80 Cm”, “WOW Raw apple” etc. So , in the first column, we will try to write Kelvin  and what you will see a list of data which Power BI extracted. Just select exact name, just follow this step for 2 or 3 rows and you will be surprised to see that rest other row data will fill automatically.

import_data_from_Site_4

Step 5:- Now add another column in the below table  where we will keep the price of the items.

so as you can see for the Kevin 80 cm TV the price is 8,499. So, when you click and try to write the amount of 8499. Power BI is intelligent enough to provide the list of extracted data with similar value. Just try the same step for next 2 or 3 rows and you will find all the prices against the product name.

import_data_from_Site_5

Step 6:- Now, we will fetch data of percentage off . As you can see for kevin TV price is 39% off. so , to achieve this just add another column in the grid and try to type 39% . As you can see in the below image. Just repeat the step for few other rows and  Power BI will do for rest other rows.

import_data_From_Site_6

Step 7 : Wow, you have extract the data which you want. so far as you can see in below image.

import_data_from_Site_7

Step 8: Now, Just click on Load button to proceed further you will get the following screen.  Proceed further by selecting Custom Tables .

import_data_from_Site_8

Step 9: Now, great news you got the data whatever you want as you can see the grid

import_data_from_Site_9

Step 10 : The only thing which might be bother you  that in Percentage Off column you were seeing brackets and % Off  extra text as well. Now, to avoid this just add another column by example as you can see below screen.

import_data_from_site_10

Step 11:  That’s great now you have the data which you want.

import_data_from_site_11

Now, we have data so we can apply any analysis which we want.

Hope this feature might help you.

Happy learning !

Import PDF data in Power BI–really excited to see

Although, in every month Microsoft Power BI team bringing new features to make Power BI more robust tool.  To add a feather in the cap of Microsoft Power BI tool, Microsoft Power Team introduced a really exciting feature which is import data from PDF.

There is the various scenario where we have to deal with PDF data and do some fruitful operation on it. I hope this new feature will help us in those scenarios where the data source is PDF.

Isn’t it cool? Let’s experience this feature by using some hands on.

Prerequisites: The first and for the most important point is, that it is in feature preview so just download the latest Power BI using following URL.

Once you download then enable the preview feature of import Power BI data using options’ Preview feature item. Just select the option Get data from PDF File

import_data_From_Pdf_step_1

Once you selected the option you might need to restart the power BI.

Now, obviously the next step is to choose the source, in this example, I downloaded a pdf from the Internet and using it. In this data source, we have Employee(Contact Name), Title Company Name Country etc.

Import_Pdf_Data_Step_0

Now, go to the new data source and select the data source with option Power BI as shown in below figure

Import_PDF_DATA_Step_2

Once you click on the option in the next step provide the source pdf file which needs to import. As you are aware we are importing Contact information related grid.

As you can see in below figure POWER BI imported various table in that specific table.

In this case, we are opting Table001 {page –10)

Import_Data_From_Pdf_Step_3

Once this done. Click OK button and apply

Import_Pdf_Data_Step_4

Now, we have PDF  grid data now in the next step just apply some steps to clean the data.  after a few steps like renaming the columns remove extract column and use column header etc. implementation we will get our grid of data imported from PDF.

Import_Pdf_Data_Step_6

import_Pdf_Data_Step7

Now, we can run a  chart to determine the contractor in each country.

import_Data_From_Pdf_Step_8

so, we have successfully gone through the option of import PDF DATA.

Hope this will come in the main line data source soon.

Happy learning!

What is collection & How to manage a collection in PowerApps ?

In the last article we learned about the different controls which exist in PowerApps although there are some more controls which we will discuss going forward before jumping into remaining controls let’s discuss here the most important part Collection.

What is collection?

A collection is used to store data that can be used in your app or we can say a collection is a group of items that are similar. For example, Student data collection where the collection will store student first name, last name and other information about the student.

To see it practically let’s open PowerApps editor and add a new screen and OnStart function create a collection.

Now to create a collection in PowerApps we have  “Collection” function in PowerApp and syntax is as follows 

Collect(Collectionname, items)

So, Student collection can be defined as follow.

Collect(StudentCollection,      {Name:”Rajat”,LastName:”Jaiswal”},   {Name:”Sandeep”,LastName:”Jain”})

OnStartCollectionNew

So, we have created our first collection. To view this in action add any control you want here we are using Gallery control.

AddGalControl

Once you added this control you will find the data properties and we can see our created collection which is “StudentCollection

StudentCollection

Here we can assign  the title and subtitle  properties of the gallery with the property Name  & LastName of our newly StudentCollection.. Just Save the application at this point and reload the app again.

You will find the following screen.

DataWithGallary

We can check our newly created collection by file option as shown below

StudentCollection_001

In this way, we can create a collection. Now, the next question is how to ADD/EDIT/Remove in the collection. So, let’s understand this now.

Add Collection

Just drag-drop textboxes, labels, and a button to add the data to the collection as shown below.  On Add, button onSelect write  below function

addCollection

Now, when you run and click on Add button. You can see the Record appears in your gallery as shown in below figure.

Collection Add

Remove Collection

Now, In the next step, we will delete the record from the collection.

The syntax of this is very simple

Remove (CollectionName,item)

Now, to achieve this add a delete icon in the gallery as shown in below figure.

DeleteCollection

On select of delete icon, we can write  Remove(StudentCollection, This.Item)

Here This.Item is selected item of the gallery to which we need to delete from the collection.

Now,  What if we want to delete the entire collection? then in such case, we have

Clear Collection

The syntax is very simple Clear(CollectionName)

So in our case, we have to write Clear(StudentCollection)

Now, to Edit a particular item in a collection the first this is select the item in the text box which we want to edit and to achieve this we bind the textbox by Gallery’s selected item as shown in below figure.

Selectcollection

Once you have done with this  then on Update button we can write Patch collection function as shown below

PatchSection

So the syntax is very simple

Patch(StudentCollection,Gallery1.SelectedItem, {Name:TextInput4.Text,LastName:TextInput5.Text})

so in this way, we can update the specific item (As shown above we updated only selected item from Gallery).

So, In this session, we understood Collection, add an item in the collection, Remove function to remove a specific item from the collection, Clear Collection to delete entire items from the collection and none other than Patch function to edit the collection.

RJ

Learn How To Start PowerApps Controls

Congratulations, in the last post you have successfully created your first PowerApp.

In this post, we will try to understand different controls available in PowerApps.  Before jumping directly into PowerApps one quick tip wants to share with you that PowerApps is very much inspired by Excel. So, whenever you stuck to any problem which you want to solve than just give a try how you could solve that particular problem in Excel. You will find most of the functions similar to Excel.

Just remember that  screen & its controls have global scope in PowerApps.

PowerApps support various controls which we will discuss shortly but before that would like to share that every control has properties and these properties has 2 types Input properties and output properties. We can update the input properties but not output properties.

with this let’s start controls:

You can use control by clicking  on control’s icon of Insert menu

ControlMenu

Label :- Label is simple a ready only control to show text value. We can change the properties like font, color, position, size etc.. from properties window.

You can write a custom function for any input properties or assign direct value.

Properties

TextBox : When we need input from the user then in such cases we can use Textbox control. For example, asking the name of the person.

Just to make you aware Text property is  Output property of textbox so you can’t assign value. while Default is in the input property to show any value in the textbox.

TextboxDefault_properties

Button: Button control is used to perform any action by clicking on it. You can write custom action using the OnSelect trigger.

Action

HtmlText :  When we have to deal with Html Data then in such cases we can use HTML textbox.

Html_Text_Input

Pen Input: This is one of the interesting control. When you need pen input from Apps like a signature or something that then you can use this control

PenInput

Date Picker : When you want date value then in such case we can use Date Picker control. We have provision to change DateTime format & time Zone from Local to UTC.

DatePicker_Control

DropDown:- Whenever we have multiple options from which we need to select the value then we can use DropDown control. DropDown control has Items properties to bind the dropDown options. If a user selected any Dropdown option then we can get by Selected property of dropdown.

DropDown_Item_Collection

Combobox:- Combobox most likely a DropDown and also provide multi selection option.

Combobox

Rating :- If we want a rating for a specific reason then we can use Rating control.

StartRating

Timer:  By the name, it is clear that it is a timer which starts counting. You can invoke an event on OntimerStart, OnTimerEnd etc..

timer_Control

Toggle: Toggle is just True/False option. So, whenever you want true/false option we can use it.

Toggle_Control

Radio Button:  Radio button is again normal control which you might have used earlier. You have a list of option and you need  to select a specific option then we can use a radio button.

RadioButton

Slider: When we required a predefined range and want a user to select from that particular range then slider is one of the option.

Slider

Apart  from this there some other controls like Form Control , Grid, Attachment etc.. which we will describe soon in our coming post as they need individual attention.

Till then enjoy reading.