Simple steps to host your WordPress site in Amazon LightSail

Hello friends,

It is always Challenging to find out good hosting solution which is secure, easy also cost-effective. Amazon LightSail is the destination of all your finding. It is one of the best Cloud Server that provides reliable secure service at the cheapest cost. In this post, we are going to host a WordPress site in a few basic steps.

Before starting in the detail let’s first visit the AWS Lightsail by URL https://aws.amazon.com/lightsail/
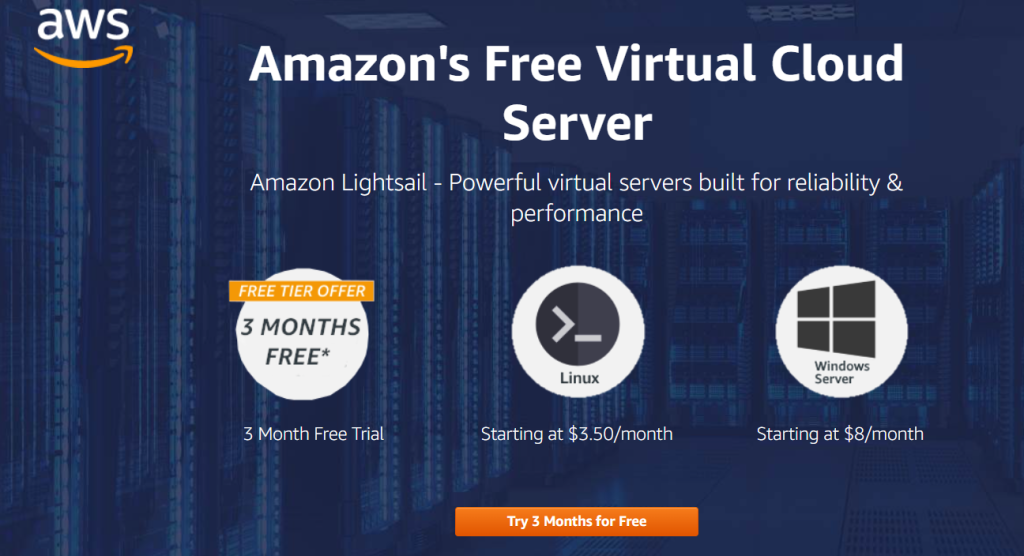
Indiandotnet - Amazon LightSail
Now, once you visit the site the first curious questions you might be thinking of the pricing so, let me share that as you can see in the above image first 3 months are free then the basic Linux plan starts with $3.50/month, and windows start with $8/month.

TAs Amazon always tries to give better performance and services so periodically they are adding better and better configuration but as the configuration of machines increases obviously, the price will also increase slightly. to know more about the different plans you can visit https://aws.amazon.com/lightsail/pricing/

I am assuming till now you have registered for the trial and want to host your first WordPress site. so let’s get started.

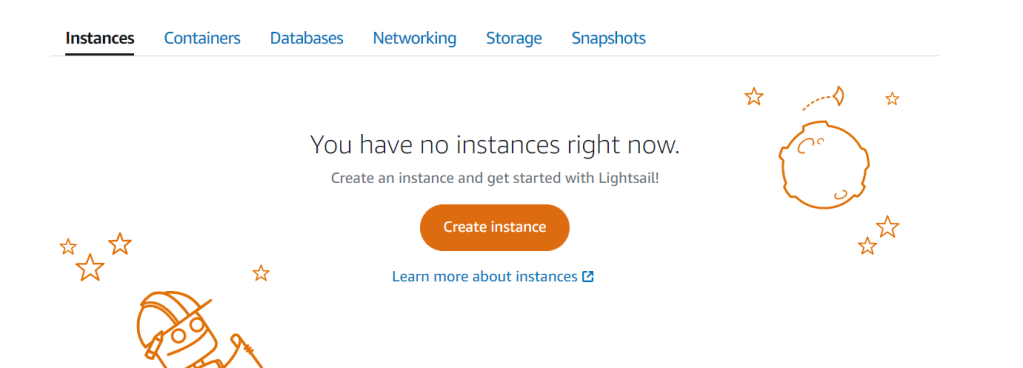
After Login the on the first screen you will find create new instance option as shown in below image
Indiandotnet AWS Create instance
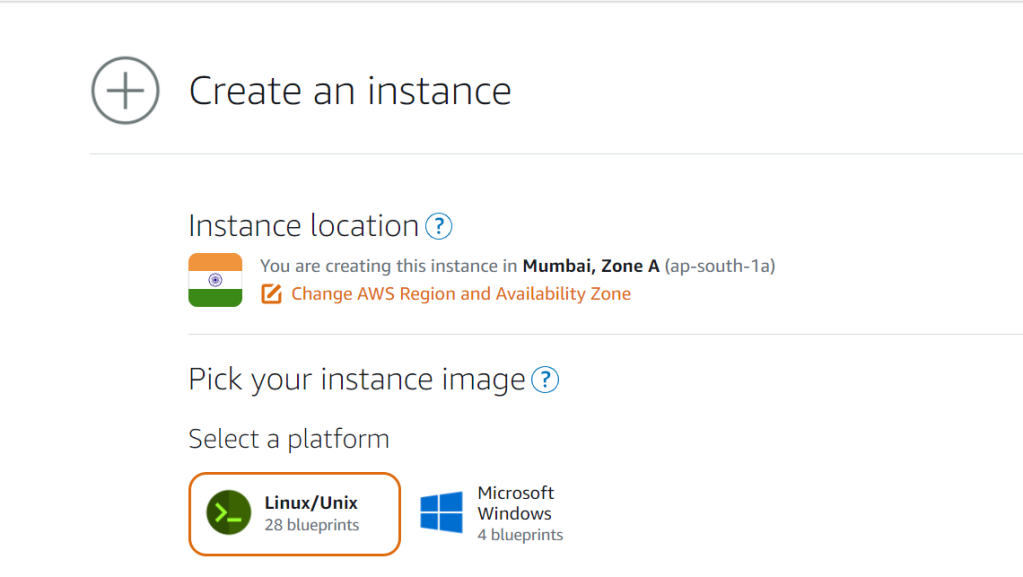
Now, just click on create instance. you will get a new screen where you have to select instance location. By default the location would be your near availability zone but you can change it as per your ease.
Once you selected the location, in the next step we have to pick up instance image. Where we have 2 option either Linux or Windows. As we are going for quick WordPress hosting solution. We prefer Linux.

After selecting the OS which is Linux, we will have few other options where we can select predefined images which we can install on our Linux instance. See below image where we have different options available. Here we are selected WordPress (first option)

Once the WordPress option is selected, in the next option we have SSH key. If you are not aware of SSH key then don’t worry. Just think it as a encrypted password which we can use to access our Instance (VM)

To make it simple, we will just download the existing default Key.
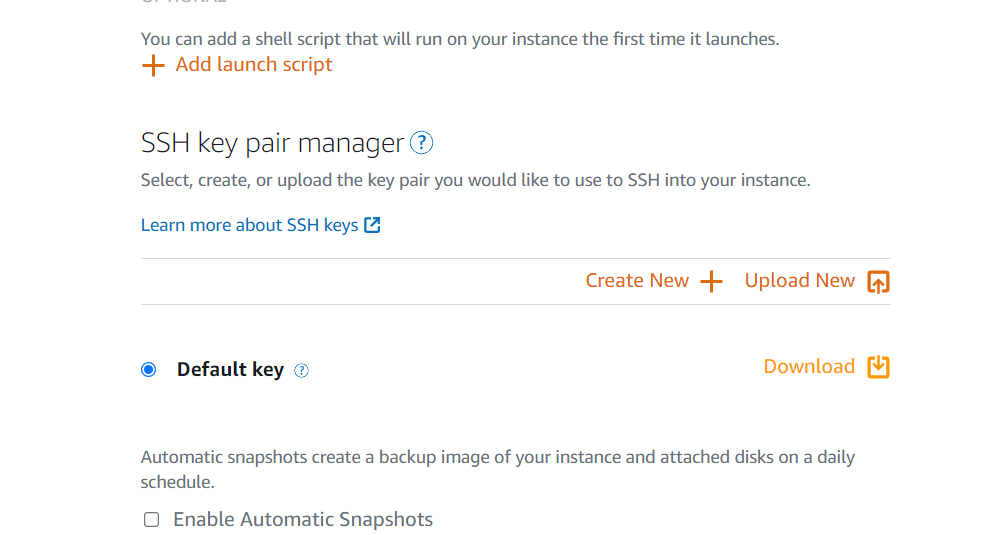
Once the SSH Key file downloaded to our local machine. In the next step we will select the configuration as shown in below image. As our WordPress instance can run on 1vCPU and 512 RAM so, we are happy to select $3.5 plan which is selected by default. There are various instance available according to different configuration like Memory, Processing, Storage etc. Once you are comfortable with the WordPress installation as per your need you can choose different plans and as mentioned AWS periodically adding new instances as well.
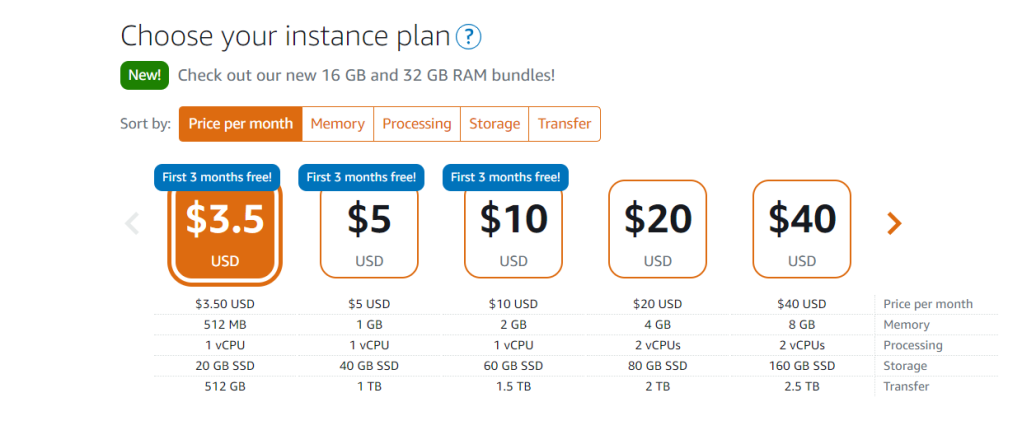
Indiandotnet  AWS LightSail Pricing

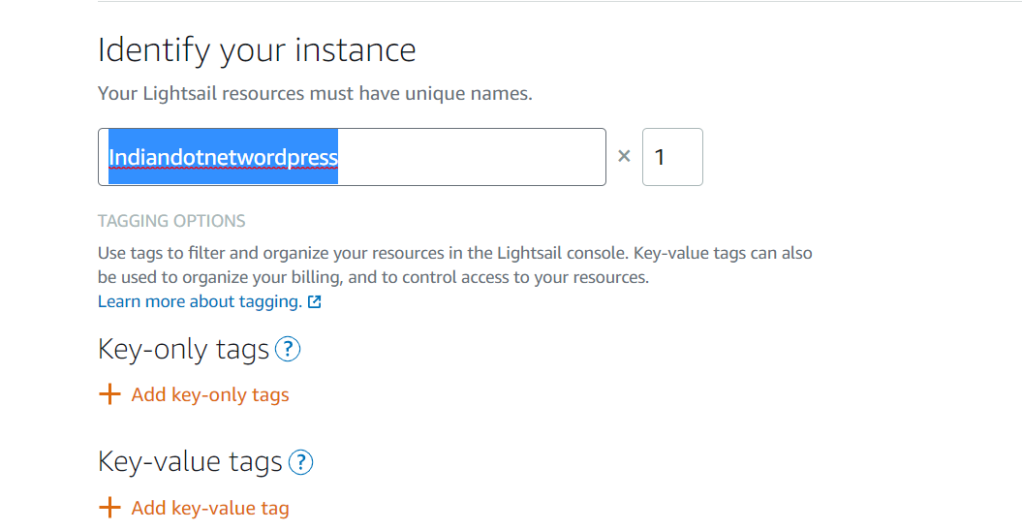
Now, in the next step we will give instance name. The instance Name should be unique here. I am giving my instance name indiandotnetwordpress. Once you provided the instance name just hit the create instance button. In this way your first WordPress instance cretaed.
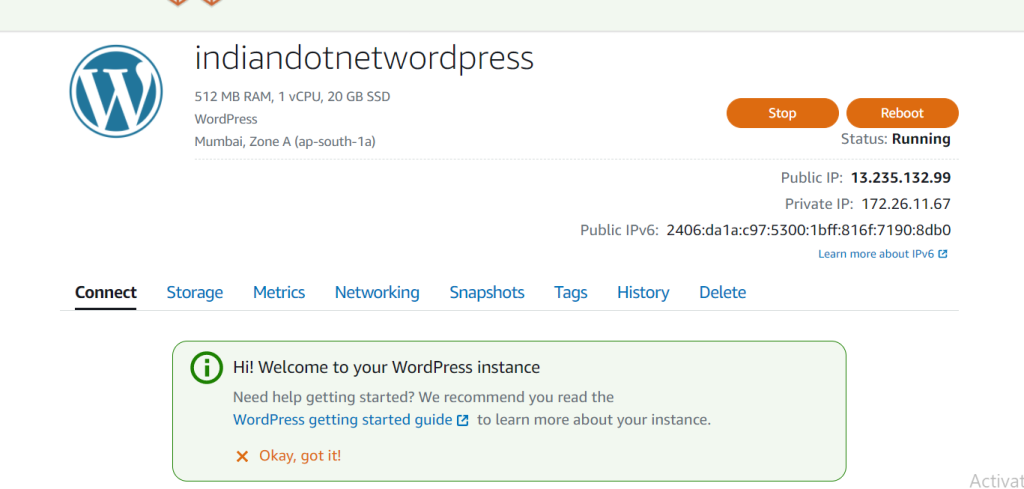
Once you hit the create Instance button in few minutes our instance would be ready and will be available in Instances tab. You can see below snap our instance in running condition.
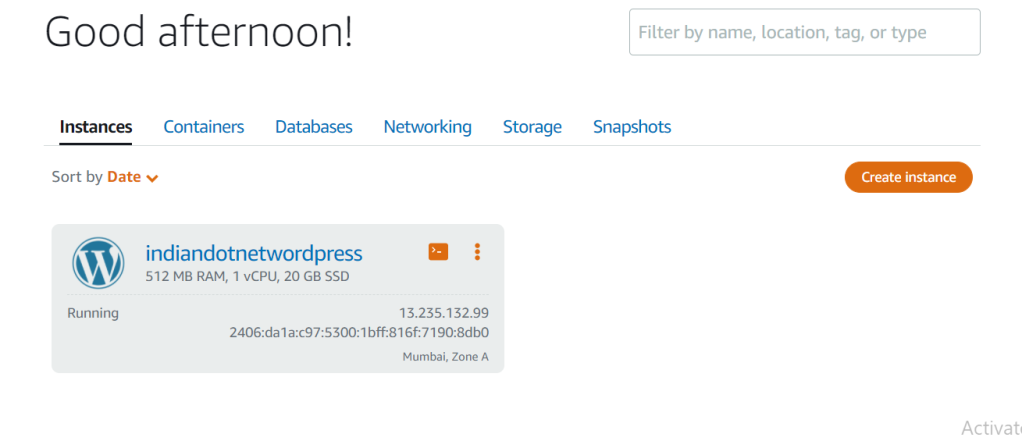
Indiandotnet aws wordpress instance running

Now, to check whether the wordpress installed or not on our new instance . Just copy the IP address from the instance detail and browse it. if you see above image my instance IP is 13.235.132.99

Let’s browse it
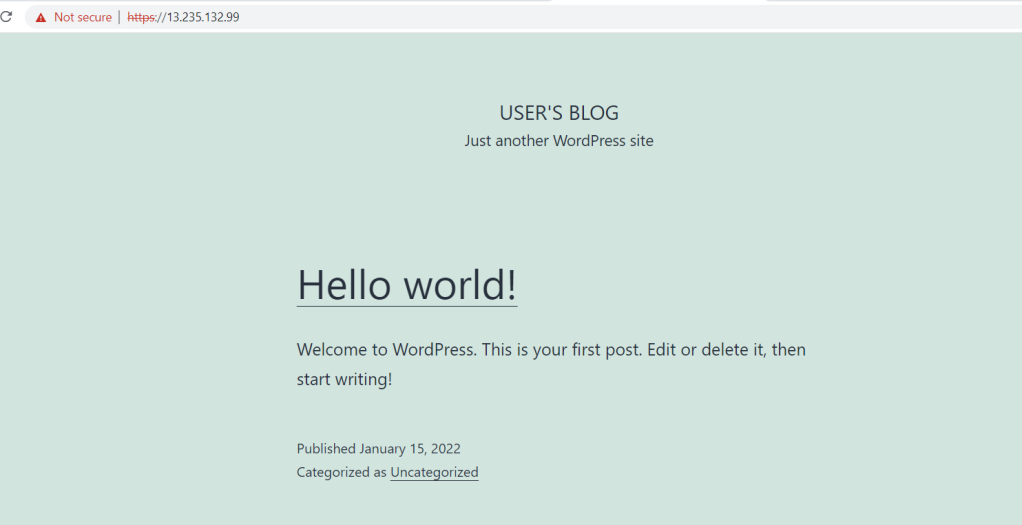
Indiandotnet_WordPress_Instance_Browse

So far so good. Wow in few step we installed wordpress but the next question might be in your mind how to access the admin part of wordpress as we don’t know username and password.

So, to get username and password just click on SSH terminal option as shown in below figure.Which will give option to access our instance.
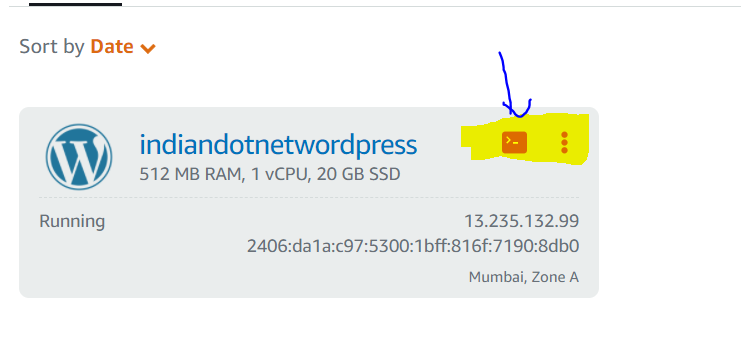
Indiandotnet WordPress Instance SSH terminal

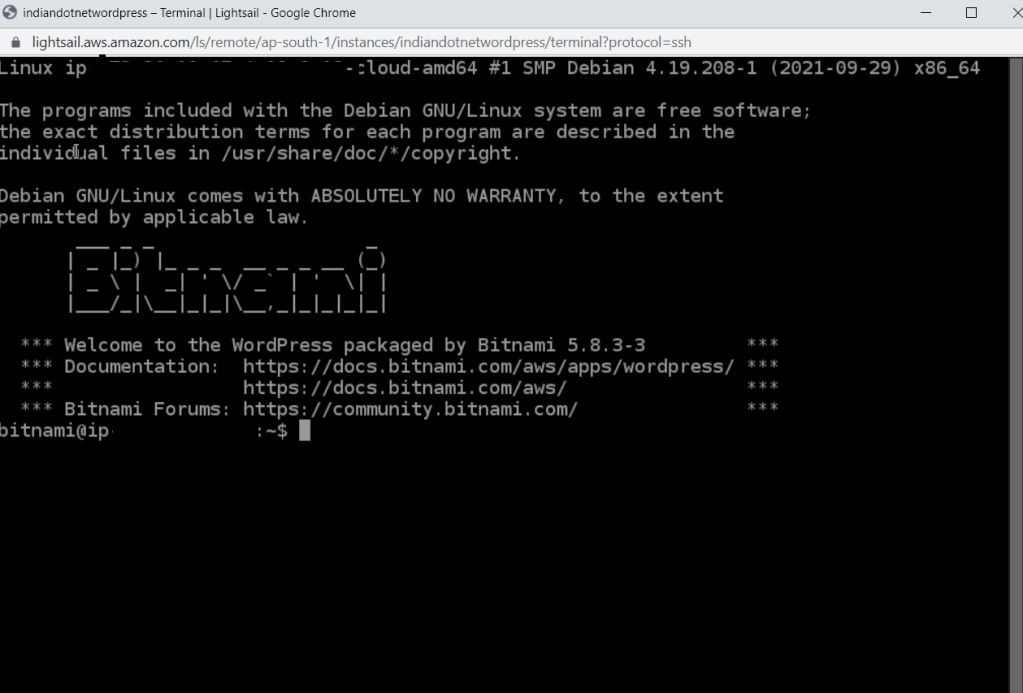
You will get following screen.

Indiandotnet WordPress Instance terminal
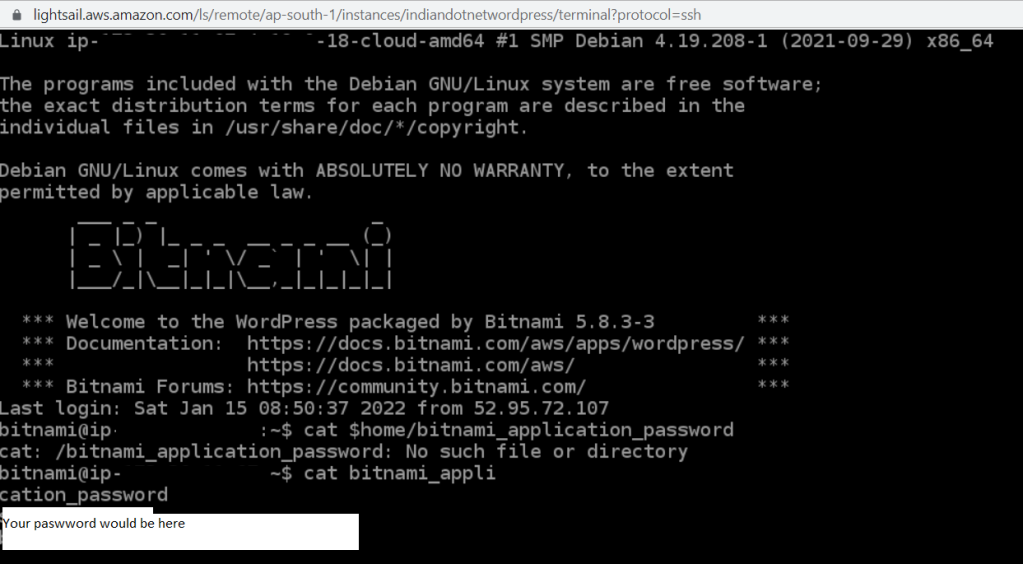
Here, you have to write following command and hit enter to get password of your wordpress admin. The command is cat bitnami_application_pssword
Indiandotnet SSH key access

Now, once the password is copied we can access the wordpress.

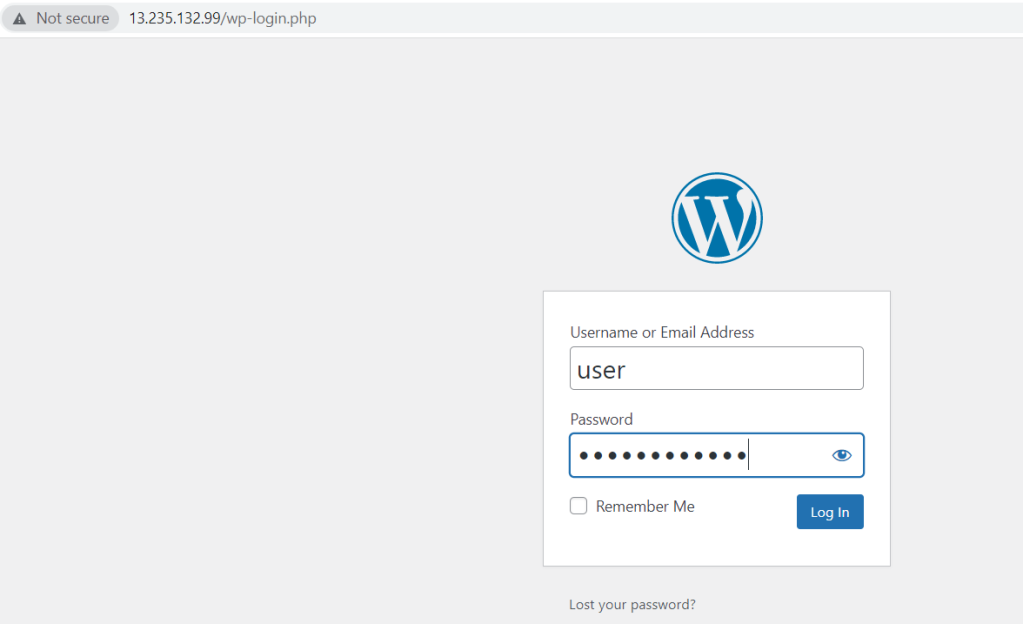
For this again go to WordPress instance and use public URL as shown below
We are using public URL and pasting in the browser with wp-login.php suffix. below page would be open where we have to provide username as user and password which we copied.
Indiandotnet wordpress access

Once you hit the login button you will be in Dashboard of WordPress now. you can manage your wordpress.
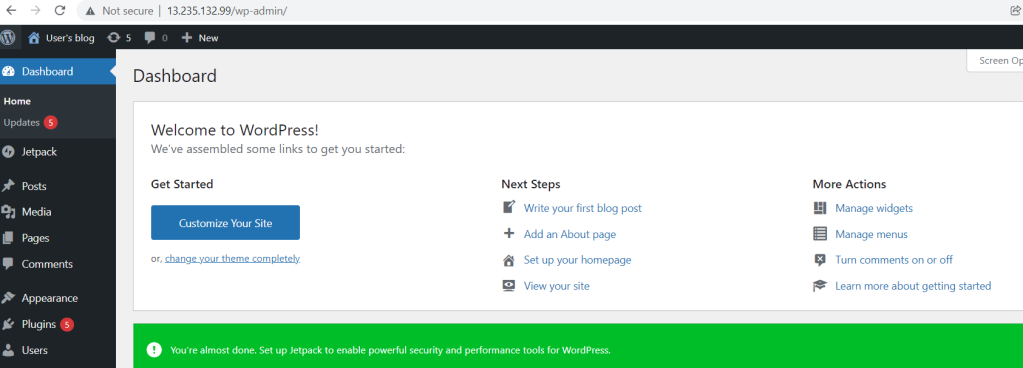
Indiandotnet wordpress dashboard
So, far so good in this post we are able to host a wordpress site and able to access it with public IP without any issue. In next post we will discuss about some other aspect light host configure domain name check CPU usage etc,.

Hope this post is useful for you. Please do post your comments.

Online Power BI Learning Series

Dear All ,

Let’s join us to learn something new in coming weeks. We have few schedule sessions for the community which might help you somewhere in your day to day work.

Let’s join us to learn Power BI. 

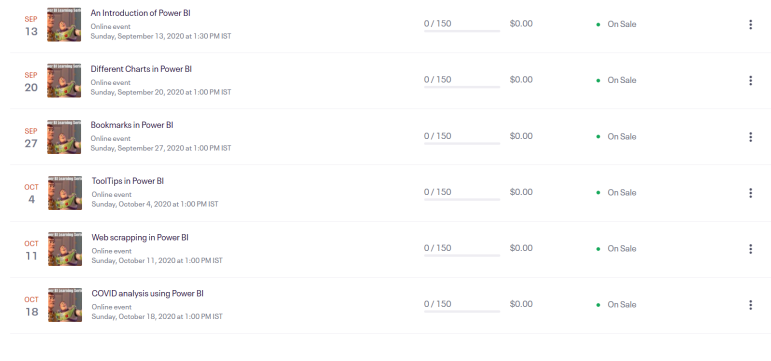
In the series of Power BI learning we will start from basic to advance and share a live demo on COVID analysis.

powerbi

Do register yourself on following events

https://www.eventbrite.com/e/an-introduction-of-power-bi-tickets-118776899905

https://www.eventbrite.com/e/different-charts-in-power-bi-tickets-118801700083

https://www.eventbrite.com/e/bookmarks-in-power-bi-tickets-118801852539

https://www.eventbrite.com/e/tooltips-in-power-bi-tickets-118801954845

https://www.eventbrite.com/e/web-scrapping-in-power-bi-tickets-118802083229

https://www.eventbrite.com/e/covid-analysis-using-power-bi-tickets-118802181523


Looking forward for your participation.


Enjoy learning 🙂


A Beginner step towards Alibaba Cloud OSS (Object storage services)

Objective: In this post, we, try to understand what is Object Storage Service in Alibaba Cloud and how to create your first Object Storage Service. We will try to understand the different business scenario where we can utilize this OSS service.

Prerequisites: The first and most important requirement is that you should have Alibaba Cloud account handy with you.

Now, as we are pretty much clear with the objective of the post and perquisites so, let’s understand what is OSS (Object Storage Service).

As the name suggest OSS (Object Storage Service) is the API service provided by Alibaba Cloud to Store different objects. It is one of the famous and unique storage services. You can store any object, any amount of data. The object can be anything which can be store for frequent access or backup or Archive any purpose.

Now, let’s understand this by different Business scenario , suppose you are running a shopping cart project where you have lots of images of the products then those images can be upload in OSS and one of the great feature which you will not find any other Cloud Storage service is that you can do image processing as well at runtime without writing a single line of code.

Similarly, You can store your shopping cart’s invoice backup or data backup. Or If you are doing any signing agreement with your dealer of sub-dealer then the singing contract pdf, image, etc can be stored in OSS.

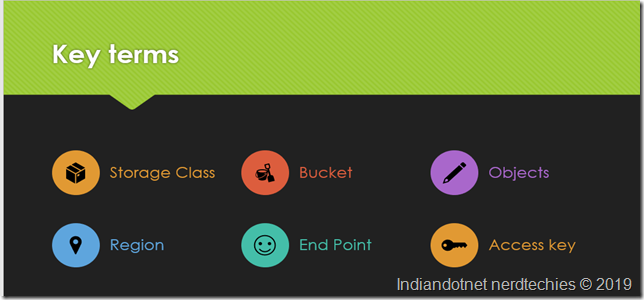
Now, before going Alibaba Cloud Console let’s understand some other terms or properties to understand OSS

KeyTerms

Bucket:- The first and most important term is Bucket. So, whenever you create an OSS you generally create a Bucket where you are going to store Objects.

Storage class:- Storage class you can think like usage of object access frequency there are 3 types exists in Storage class

  • Standard:– Standard like the object which you saved in the bucket can be used frequently. For example, if you have Instagram like the site then the images can be saved in Standard class account.
  • Infrequent Access:- This you can think like a life cycle to store the object is high but it will be accessed infrequently. Means, not very often. Although, there is a minimum storage duration limit is 30 days.
  • Archive:- As the name suggests it is just for storage purpose only. The chances to access this object is very rare. Similar to the IA class, Archive has a minimum of 60 days storage duration.

Now, You can think the above classes type like Hot & Cold access. Now, depending upon the accessibility and storage the charges will vary.

Region: Now, the region is like a geographical location where the object primarily saved and access. Alibaba cloud has various region available.

End Point:- The endpoint is nothing but the URL (Domain Name) by which the service will be accessed by us.

Access Key: Access key is nothing but Access key ID and secret. which ensure the service is accessible by an HTTP request.

Below are some of the features

  • High availability 99.999999%
  • No storage Limit
  • Hight throughput and low – latency access performance (although for Archive Latency can be in Minute for other classes it is in MS)
  • Support HTTPS
  • We can process images as well (except archive class)

Accessibility of Storage: We can access the storage by following ways

  • https URL
  • SDK (we can use different programming language)
  • OSSBrowser (A Graphical tool to access OSS just assume like file browser)
  • OSSCLI ( Common Line Interface tool)
  • OSSFs (Is tool to mount storage to your Local File system which you can access like any other drive)

Now, without wasting the time we are going to see how to use OSS. Let’s start step by step

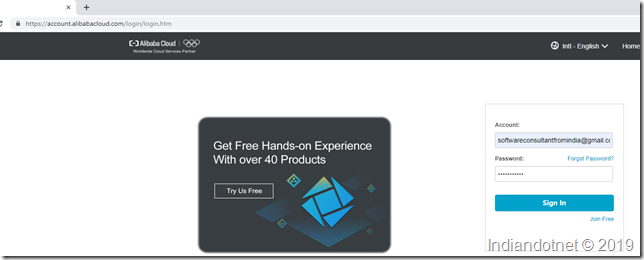
Step 1:- Open https://account.alibabacloud.com/login/login.htm and provide your valid username and password.

Indiandotnet_OSS_Login

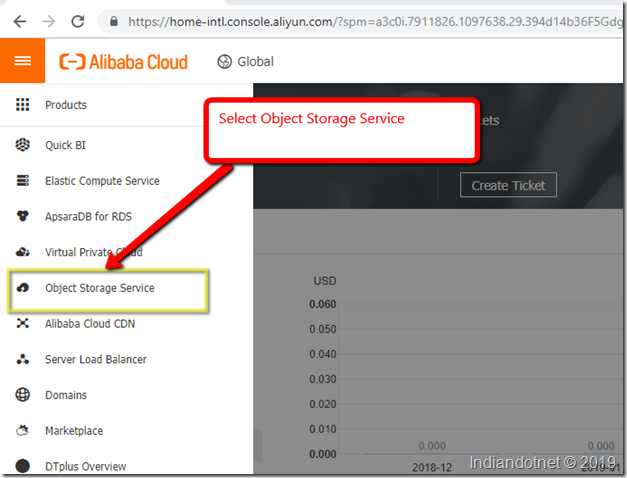
Step 2:- After Login click on Console option on the top. You will get the following screen. Where you have to select Object Storage Service

Indiandotnet_OSS_Console_2

Step 3:- After clicking the OSS you will get Dashboard. Which give you the option to create new Buckets, see existing buckets and bandwidth /Storage consumed so far.

OSS_Dashboard_Indiandotnet_3

Step 4:- As we need to create a new Bucket to click on Either + symbol on the Left side or option create a bucket on the right side.

OSS_Create_Bucket_Indiandotnet_4

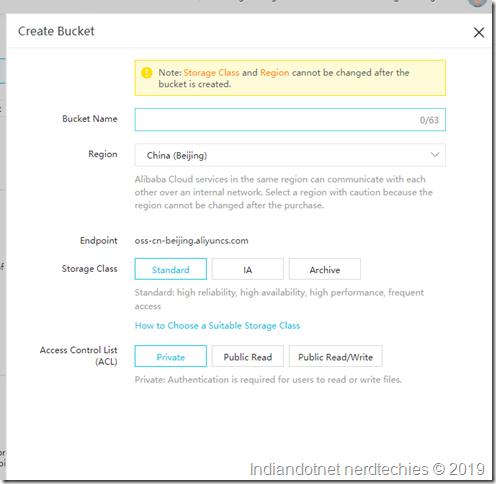
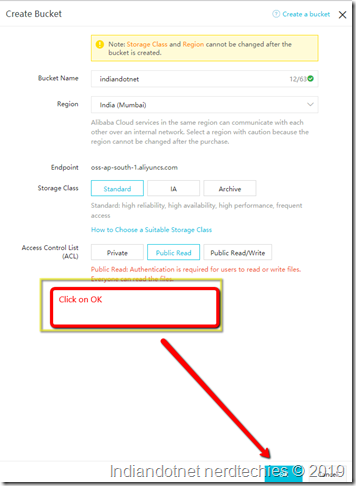
Here you can provide the unique bucket name provide the region, storage class and Access Control List as per your need. Once you filled the details click the OK button as I did in the following screen

Create_Bucket_Indiandotnet_5

Step 5: After clicking the OK button our first Bucket is created with the name “Indiandotnet”. You will see different details and option.

Indiandotnet_Bucket_6

Step 6:- Here, we will click on the Files tab.

OSS_File_Option_7

We can see a different option like Upload, create Folder, etc. Just below to that we have existing uploaded files detail.

Now, let’s try to upload a file by clicking upload button available on the screen.

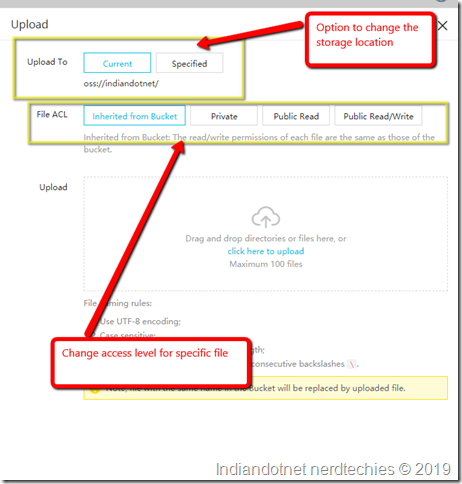
Step 7:- This is the best part which you will agree. We can upload the file either on the root or any specific folder. Apart from this, we can control the Access of the File from private, public read, public read /Write

Upload_File_Option_Indiandotnet_8

Step 8:- Just upload any file you want. After upload, you will find the file details in the grid as shown in below screen.

Uploaded_File_List_Indiandotnet_9

Step 9:- Here, when you click on More option next to the file row you will find a context menu with different option as shown in below screen. We will discuss those option later but for current interest just click on Copy File URL.

Indiandotnet_OSS_File_Different_Option_10

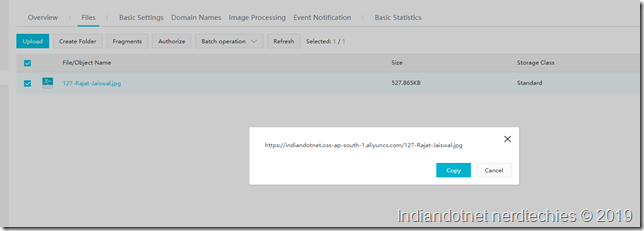
Step 10: When you click on Copy File URL you will get URL of the file as shown in below screen. Just copy the URL and access the file.

Indiandotnet_Copy_URL_Option_11

So, After reading the above steps and details you will be able to answer the following questions

What is OSS (Object Storage Services)?

What are the Key terms Of OSS?

How to Create our First OSS?

How to Access your file using HTTPS URL?

In the next few posts, I am going to describe some more tips which will be helpful to answer

How to process uploaded image at runtime? a very exciting and unique feature which I doubt supported by any other cloud provider.

How to access the storage programmatically via C#.

Please, provide your inputs on this post and wait for a few exciting posts related to Alibaba cloud Object Storage Service.

How to start with Microsoft flow ?

Dear Friends,

Microsoft Flow is one of the hot product nowadays and it is not new. It is in the industry from the last few years. In this article, we will try to explore Microsoft Flow and know how it can be helpful to you with an example.

I have changed my writing style in this blog to resolve all the question which you might have if you are new to Microsoft Flow.

What is Microsoft Flow?

Microsoft Flow as the name suggests it helps in building the workflow to resolve business problems or we can say that It helps to automate workflow to resolve business needs or problems. It is basically part of the Microsoft Office 365 suites and mainly created to Business users or Business Analyst to solve or automate their business needs without having knowledge of different programming language like Java C# etc.

It makes you smarter to solve your problem with doing automating the steps. It is a graphical based tool to design flow to resolve any problem.

What are the different scenarios where I can use Microsoft Flow?

Now, you might be thinking of where you can use this. below are several business scenarios where we can use flow.

Examples :-

Email or Mobile Notification

Suppose, you are a marketing team head and you want a notification on your mobile whenever any new lead is generated, then in this case Microsoft Flow will help you.

Folder Watcher

Suppose, you are working on Printer server and your task is to continue watch files in a folder and if any new file arrived in that DropBox folder then you have to print it and share in the email to the XYZ person, then in this case also you can use flow.

Data collector

The other example is to dump the twitter data in your database. For example, you want to monitor what are the different tweets are coming on your newly launched product or product features so you can analyze the sentiments.

Streamline approval
your employee added a Leave request in your portal then Flow will send an email to the manager and as a manager you can approve or hold or cancel that request either directly from outlook message of from Flow itself as per your decision the result will be updated in your portal and a notification email sent to requester employee.

There might be tonnes of examples, or situations where we can use Microsoft Flow to automate and ease our work.

How it is different from Logic Apps?

Now, as you might have gone through my previous blogs and you might be thinking it is just like Logic Apps. So, my answer is yes, it is same as Logic Apps because it is created on top of  Logic Apps. but there are various different points where it differs from Logic Apps.

Below are some of them.

1. Flow is Office 365 suits part and an Individual application for which you don’t need Azure Subscription but for Logic Apps you required Azure Subscription.

2. Flow is developed for Business users /Business Analyst so, you don’t need to write complex code or modify the existing thing use Visual studio to enhance or create but Logic Apps is mainly for developers or people who have programming knowledge so if may require they can change the visual studio code.

What is the first step to start Microsoft Flow?

To start the flow you need to sign up on website https://flow.Microsoft.com. If you are office 365 users then you can sign in with that account or use any other email like Hotmail, outlook to sign up.

Now, you might be thinking about the pricing. There are 3 different plans available, free, Flow Plan1,  Flow Plan 2. depends upon your need you can choose any plan.

Indiandotnet_Microsoft_Flow_Price

Once you opted the plan and sing In after login you will get following home screen to proceed further or we can say this would be your play area where you can create different flows.

Indiandotnet_Flow_Home

Just, make you aware there are various predefined templates available which are created based upon various frequently business needs

Indiandotnet_Flow_Template

How does it work?

Now,  as mentioned earlier it is most likely Logic Apps. So, similar to Logic Apps it has the various connector.

Just think if the concept “if something happened then we have to do something”. So, basically this is based on Trigger and then Action. concept.

Example, An email came to your inbox (Trigger) then (Action) send a mobile notification.

There are more than 200+ connectors available to help you and ease your work.

Indiandotnet_Flow_Connection

Can we have a step by step example to try it out?

Yes, and believe me this is one of the important examples for all the blogger and they will surely, like it.

For a blogger the challenge is promoting his/her post and for which he/she needs to create a shorten URL either on (goo.gl or bitly.com)  and then share on Facebook, Twitter or other social media channel.

Now, this is again a time-consuming process. Now, what you think if we can automate this process.

So, our challenge is whenever a new post is added in the blog then our flow identify that trigger and then provide that link to bitly.com and create a short bitly link and then post the generated link to social media (but in this example I created the notification to make it short and sweet choosing existing template ).

Now with the assumption, you already created your account in the Flow and logged in successfully. we proceed further.

Let’s follow the step here

Indiandotnet_Flow_WordPress_Step_1

Step 1: A an existing template “When a post is created in ”WordPress create a Bitlink URL and send the notification” as shown in below figure.

Indiandotnet_Flow_Wordpress_2

Step 2: Now, as you can see we have to configure the btily authentication and allow Microsoft Flow to access bitly.com to create URL. as shown in the figure.

Indiandotnet_Wordpress_step_3

Step 3:- Once you allowed it.  in the next step, we have to give authentication and authorization to access our WordPress blog. So, whenever a new post came flow will identify. so, just provide access as shown in the below figure.

Indiandotnet_wordpress_Step_4

Step 4:- so far so good we have given authorization for bitly & our WordPress blog.  we don’t need to configure the next step because it would be automatically configured. Now, we are good to go. we have configured perfectly in a few clicks, just save the Flow and check the flow using flow checker option.Indiandotnet_flow_test_Step

If there is no error you found in Flow Checker just click the Test option as shown in below figure.

Indiandotnet_Flow_Office_Step_8

Step 5: Now, go to your blog and create a post and publish it. You will be surprised that your flow automatically identified the new post and created a short URL and notify you as well.

You can see all the flow steps are checked it means the flow is successful.

indiandotnet_Flow_WordPress_11

Step 6: Now, you can check bitly.com and you can find the URL is created and also you got the notification.

Indiandotnet_Flow_Wordpress_12

Step 7: You can check each step detail as well by clicking the object

Indiandotnet_Flow_WordPress_Step_13

So we are good with the flow example.

Please, share your input on how you like the flow and this post  Smile

Happy learning

A simple way to check vulnerability status of your SQL SERVER database

As a product owner, you always worried about the different security aspect of your application and SQL Server Database is one of the main important parts for which you might worry.

And you always think there should be some kind of checklist which you or your team have to check whether your database is secure or not and find all the vulnerabilities.

And obviously you might have purchased different tools to this assessment as well who will provide you security loopholes but when we talk about Database the option is limited and some options are very costly.

With SQL SERVER 2017 latest  SQL Management Studio your one of the problem will be resolved cross-check your database vulnerability.

You heard it right. Although, this feature is already available in SQL Azure but now you can do this assessment of your database using SQL Server 2017’s  management studio.

This vulnerability assessment report can be generated on the database with few simple clicks and you will get different High, Medium , Low risks of your database.

The vulnerability assessment report not only provide risks details but also help you to identify which category  of it and this will not stop here you will get a recommendation as well to fix those problems. Sometimes , you will get direct scripts which you can run to fix those issues and sometimes you will get the links on how to implement those.

Let’s understand this by step by step action.

Before starting to make sure you have SQL Server 2017  Management  Studio’s latest version.

Step 1: Once you opened the SQL Server management studio right click on the database which you want to cross check.  in this example, I am using the AdventureWorks database. As shown in the below figure.

Indiandotnet_Vulnerability_Assessment_1

Here you have 2 options either Scan for Vulnerabilities or Open Existing Scan

Step 2: Now, as we are doing it the first time so click on Scan for Vulnerabilities option. and you will get the following screen where you can provide the location of scan file.

Indiandotnet_Vulnerability_Assessment_2

Step 3:-   Just click on OK button to proceed further and wow you will get all the loop holes of your database.

You can easily check what are different points on which your Database is failed with risk Assessment.

Indiandotnet_Vulnerability_Assessment_3

As shown in the above figure , we have 6 check points on which our database failed  in which 1 is on high risk , 3 medium risk  and 2 Low risk.

And if you see carefully there are different categories as well like data protection, Authentication and Authorization, Surface Area Reduction etc.

Here as the name suggest Data Protection is mostly related to encryption of your sensitive data like SSN, DOB etc or TDE.

Authentication and Authorization  is more relation to login access of the database.

Surface Area reduction  is more related to what extra option you have opened .

Step 4:- Now, move a step further and click on any row in the grid. You will find the details of the row just below the grid. As you can see in below image when we click on data protection it suggesting the column names which come under extra care and to on which we might think to apply encryption.

Indiandotnet_Vulnerability_Assessment_4

Step 5:-  The story does not end here, for some of the problems this assessment report provides script as well and if the script is not possible then provide a reference link to resolve that issue.

As you can see in below screen we are getting recommendation scripts to apply.

Indiandotnet_Vulnerability_Assessment_5

Isn’t it cool and simple to assess your database’s vulnerability in a few clicks and secure your database?

Share your thoughts.

Happy learning !

Are you aware for your free domain .TECH with Alibaba Cloud Service

In our step by step tutorial this is our next post in which we will see how to avail your free .TECH domain with Alibaba Cloud computing.

Apart from cloud services  Alibaba Cloud Computing also sell Domain names which we can avail with minimum amount.

A good news is that you can avail .TECH domain free for 1 year. Below are the steps.

So in the first step login to the Alibaba Cloud and check the  Free trial.You will find below option as shown below

Alibba_DomainName_Indaindotnet_Trail_option

Step 2: – Click on  Try Now  button to proceed further

Alibaba_Search_Domain_Indiandotnet

Step 3:-   Now you have to search your domain name which you want . If  that domain name is available then you will find in below list. Just select the checkbox in front of the domain name. In the current demo we are going for a free domain which is .TECH and luckily Indiandotnet.TECH is available. So, I am selecting that and clicking on AddToCart button.   After clicking the we will get following screen.

Alibaba_Cloud_Indiandotnet_Domain_Cart

Step 4:- once you check and everything looks good to you in next step

you have to register for domain which is required for domain ICANN. You will find  below notification if you have not registered.

Alibaba_Cloud_Registration_Profile_Indiandotnet

Step 5:- Simply create registration profile to proceed further and you will find below screen of registration.

Alibaba_domain_Registration_indiandotnet

One point is to remember here the information like registration email and contact number should be valid. Once your email is verified then only you can place order.

Domain_screenAfter_Verification_done

Step 6:- Now next you will get confirmation order screen as shown below

Alibaba_Cloud_Domain_confirm_Order_indiandotnet

step 7:- Once you confirm all your detail is good and everything looks good click on next step where which is payment. As this is a free trial account for 1 year so it is absolutely free. so you don’t need to pay anything. if you see here pay is $0.00

Alibaba_Domain_Payment_Indiandotnet

Step 8:- Just click on Pay button and you are will find confirmation screen as shown below and congratulations you avail 1 year free .TECH domain.

Alibaba_Cloud_Indiandotnet_Confirmation

Now , it might be your next question now where we can find this domain .

Alibaba_Console_manage_domain_Indiandotnet

Apart from free domain other domain also available in very cheap price which you can try.

I am pretty much sure will try the free domain and buy new domains going forward.

Enjoy!!!

How easy to do a database Copy in SQL Azure?

Sometimes, you might require a copy of your database for some R&D purpose and there are various ways to achieve this.

If you are new to Azure SQL then you might think of those traditional ways which are good.
Let me share a simple command here which do the same task of a database copy.

CREATE DATABASE <New Database Name> AS COPY OF <Source Database>

Suppose, we have a database with the name Northwind and want to create a copy with name MyNorthwind in SQL Azure.
Now, to achieve this we have to write following command.

CREATE DATABASE MyNorthWind AS COPY OF NorthWind

I hope you might like this a quick and easy way and use it.

Everywhere JSON so why not in SQL SERVER–New feature in SQL SERVER 2016

If you are a developer then surely you might have used JSON (JavaScript Object Notation) but, if not then don’t worry you might use sooner than later. JSON is kind of ecosystem which is most popular in the various area for exchanging the data. If you talk about charting solution, AJAX, Mobile services or any 3rd party integration then generally JSON is the first choice of the developers.


If you see nowadays most of the NOSQL database like Microsoft Azure Document DB, MONGODB etc. also using JSON ecosystem and some of them are based on JSON.


As it is such a popular growing system So, why not in SQL SERVER?

In SQL SERVER 2016 JSON introduced. This we can say a step or bridge between NON-relation database and relational database by Microsoft SQL SERVER


SQL Server 2016 providing following capabilities when you are using JSON

  1. Parse JSON by relation query
  2. Insert & update  JSON using query
  3. Store JSON in database


If you see it then conceptually it is similar to XML data type which you might use in SQL SERVER.

The good thing  in SQL SERVER 2016 for JSON there is no Native data type.  This will help in migration from any NOSQL to SQL SERVER.


SQL server provides bidirectional JSON formatting which you can utilize in a various way. Suppose data is coming from the external source in the JSON format then you can parse it and store in table structure (if required) in another case external source require data in JSON format while data in SQL SERVER in tabular format so both the purpose can easily solve with  SQL SERVER’s JSON feature.


Now, let’s jump directly to the practical to check JSON capabilities in SQL SERVER


1) FOR JSON AUTO

It is similar to  FOR XML AUTO.  It will return JSON object of selected column where column name is treated as a Key or in other words we can say it will format the query result in JSON.


JSON_Feature_Indiandotnet_1

when you run above command the result will be like as shown in below figure.

JSON_Feature_Indiandotnet_2


2) FOR JSON PATH: –

It’s exactly like JSON auto the only difference is instead of SQL SERVER we have full control over the format. JSON Auto take predefined column schema while with JSON path we can create a complex object.

For example, we are using AdventureWorks Sales order table and joining that with product table to get sub-node. If you see in below image we have added Root node as well. This root Node can be added in JSON auto as well if required.

JSON_Feature_Indiandotnet_3


Now, when you run the above query we can get complex JSON object as follows

JSON_Feature_Indiandotnet_4

3) IsJSON function:-

By the name, it is clear that this is a validating function.

To cross check whether the provided string is a valid JSON or not we can run ISJSON.

JSON_Feature_Indiandotnet_5


4) JSON_VALUE:-

  By the name, it is clear that if you want to get the value of the particular key of JSON then you can use this beautiful function which is JSON_VALUE.

JSON_Feature_Indiandotnet_6

5) OPENJSON function:-

This is a very beautiful function which you can use to parse external schema. Suppose, you got a JSON string from a mobile service which you will directly pass to SQL Sever and SQL SERVER stored procedure will do rest of the operation to parse it. The parsing and other operation can be easily handled by OPENJSON. The only tweak here that it required database compatibility level 130   which you need to do (if not compatible with level 130)

JSON_Feature_Indiandotnet_7


There are many other interesting things which we will cover later.

Please, provide your inputs.

RJ

ROW LEVEL Security SQL SERVER 2016

To understand RLS (ROW LEVEL SECURITY) let’s understand the different problems first.

Problem 1 Suppose, you have a Multi-tenant e-commerce website and different companies registered on your website and you have centralized single database for all the client. Now as a product owner it is your responsibility that one tenant’s data should not be available to another tenant.  This is a very common problem.

2. Now, Suppose you have hospital database in which you have login user of different doctors & nurses. Now, your challenge is to show data to doctor or nurses to their relevant patient to whom they are giving treatment, not any other patient data should be available .

Here, limiting the user’s access to only certain rows of the data in database many have various reasons like compliance standards, regulatory need or security reasons.

Now, I know you were thinking that all the above problem can be resolved at code side easily by writing custom logic. I will say here yes you are right but this is not the 100% solution.  For example, if you have 4 different application like web, mobile, console, windows (Excel) and all has their own DAL then you have to implement this custom logic to every application and suppose  tomorrow if any time a new 3rd party came which want to integrate your data  or access database directly then in such cases it is tuff to apply same logic.

So, all the above problem can be easily handle using SQL SERVER 2016’s feature which is ROW Level Security (RLS). Security is one of the key areas which is handled in SQL SERVER 2016 very seriously.  As RLS (Row Level Security) is centralized security logic so you don’t need to repeat same security logic again and again.

As the name suggested Security implemented at Row Level in SQL SERVER 2016. In the Row Level, Security data is access according to user roles. It is a centralized data access Logic.

RLS has following properties

  • Fine-grained access role ( control both read & write  access to specific rows)
  • Application transparency  ( No application changes required)
  • Centralized the access within the database
  • Easy to implement & maintain

How RLS works?

RLS   is a predicate based function which runs seamlessly every time when a SQL is run on particular table on which RLS  predicate function implemented.

There are 2 predicates  which can be implemented in RLS

1) Filter Predicate: – By the name, it is clear that it will filter the row or we can say exclude the rows which do not satisfy the predicate and stop further option like select, Update & Delete.

for example: Suppose, you want to restrict doctor to see other doctor’s patient data then in such case you can apply filter predicate.

2) Block Predicate: –  This predicate helps in implementing policy by which insert, update and delete rows will prevent which violate the filter predicate. In other words, we can say it explicitly block write operation.

For example, you have multi-tenant application and you want to restrict one tenant user to insert or update other tenant’s data. Or suppose you have sales representative who belongs to specific region so they can not insert , update or delete other region’s data.

Demo:-

I know you will be super excited to see the demo of this feature so. Let’s do it right away.

There are 2 basic steps to create RLS

a) Create inline table function  or we can say predicate function  and write custom logic to control user access to every row

b) create the security policy and apply it.

In this demo ,I am creating a  new table called Patients which has following schema.

RLS_Demo_Indiandotnet_1

Here, I have inserted 2 rows for Nurse1 & 2 rows for Nurse2

RLS_Demo_Indiandotnet_2

The objective is to show only those rows to Nurse1, Nurse2 in which they are the in charge and a doctor user can see entire table’s data.

To achieve this let first create 3 users  in database

RLS_Demo_Indiandotnet_3

Once the users are created the next step is to grant permission of select to Nurse1 & Nurse2 user and full permission to doctor user.

RLS_Demo_Indiandotnet_4

Now, before creating function it is a standard to create a security schema in our case we are creating a schema with name sec as shown in below figure.

Now, create a function which will have security logic. The Logic is very simple if the user is doctor Or any in charge name then return 1 else 0.

RLS_Demo_Indiandotnet_5

Now create a security policy to proceed further

RLS_Demo_Indiandotnet_6

Till now we are good to go. Now, let’s test the security policy.

Firstly, running the select query with default user “dbo.”  and we have not given permission for this user if you see fn_RLSPredicate we have not mentioned it so obviously the result would show “0” records.

RLS_Demo_Indiandotnet_7

Now, running the same select statement but executing with “Nurse1” login then you will find 2 records which are relevant to Nurse1 is visible.

RLS_Demo_Indiandotnet_8

Similarly, I am running the same statement for Nurse2 user by running command “Execute as user” so, again I will get 2 records

RLS_Demo_Indiandotnet_9

Now, running the same statement with Doctor user and as per our expectation, it should show all 4 records.

RLS_Demo_Indiandotnet_10

So, as you can see we have achieved the goal using RLS (Row Level Security) feature. Now, next thing which might occur in your mind how to disable this policy if required then doesn’t worry it is very simple. Just alter the security policy and make state = off as shown in below figure.

RLS_Demo_Indiandotnet_11

I hope till now we are good to work on RLS. In next couple of post, we will dig deeper in RLS.

Please, share your thought for RLS.

What your face says let’s find out using Microsoft Emotion service

We always hear your face say everything. Your emotions on your face says everything. Microsoft’s did a great job to identify these expressions,these emotions  with Microsoft Cognitive Service.

Microsoft Cognitive service is an umbrella which has various APIs to help us intelligently.

Emotion API is one of them to determine the the expression or emotion in a image.

With the help of this Emotion service we can easily identify the emotion like happy, sad, fear,surprise etc.  The best part of this API is that it detect all the faces in an image and provides the emotion collection object. Another good thing about this API is it is easy to use you just need to pass the image and rest other thing is handle by API itself.

Now, I am very sure you are curious to know more and want to implement it at your end.  I am trying to share basic steps how you can use this in your project. just wanted to share that I am using MVC C# in my example .

In my example, I tried to upload  an image and passing that image to API and according to API result showing the result. so Let’s begin with step by step

Step1 :- First & for most important step is register for this API and grab your subscription key.  To get this  you have to register on https://www.microsoft.com/cognitive-services/

Once you registered you can get the subscription key from my account. As you notice in the snap below in free trial we have 30,000 transaction per month & 20 per minutes API calling facility.

Indiandotnet_Congintive_Service_Key

Once you got the key the next step is implement it in your project.

Step 2:- You can implement this via API URL or Nuget package manager in visual studio.  Just to update you that Microsoft’s Oxford team is working on this so the namespace name is Project oxford.

Indiandotnet_Nuget_Package_Oxford

In my project , I successfully installed nuget package manager

Indiandotnet_Installed_Through_nuget_Package_Manager

Step 3:- Once the Emotion package installed in your project simply create the object of Service API and call.

Pass the image steam or required parameters as per the documentation. As you can see in below image, I have created a new object of EmotionServiceClient & passing subscription parameter to avail it.

Once my object is Created, I am calling RecognizeAsync method in and passing the uploaded file stream.  This Recognize Asynch  method.

The best part is it return Emotion’s array by determining the number of faces. but in current, code I am just interested in determining the emotion of single face. So, I did code accordingly.

Indiandotnet_Calling_emotion_API

Step 4:-  To capture all the emotion’s score I have created a EmotionScore class as you can see below.

Indiandotnet_Different_Emotion_Capture

Step 5:- Once Everything setup just run the page and upload image.when you upload the image you will get emotion collection to play. See below snap in which I tried the same.

Indiandotnet_Sprised_Aayush

I tried with several expression (Thanks to my little champ“Aayush” to help me out with his cute expressions).

Indiandotnet_Different_Expression

As mentioned above you can use API URL as well to call it.

I hope you may like this new face expression API. For more information you can visit following sites

https://www.microsoft.com/cognitive-services/

https://www.microsoft.com/cognitive-services/en-us/emotion-api

Different samples https://www.microsoft.com/cognitive-services/en-us/SDK-Sample

Please, feel free to share your inputs.

Happy coding !!

RJ