4 tools making your life easy by generating TEST Data Load

As developer /QA it is always a challenge to check the application on different parameters and Data Load is one of them.

Sometimes it is not easy to generate the load manually and we may skip this very important process to check our application on different data load which may cause extra pain to our end users, customers and to our team as well.

To avoid this either you yourself write some scripts (I will share an easy way to generate data load by SQL Script in near future) or use some outstanding tools available in the market.

In this post, I am going to share 4 best tools available in the market which I have used and my feedback according to my experience.

You can also try with trial versions and proceed further.

1. Apex SQL Data Generator:

Apex  SQL Data Generator is one the simple tool which I tried. It provides a free trial version for play.

Apex_Test_Data_Geneator

Below are some points which I like about this tool. This tool is not an open source but you can try this with the free version.

  • Easy to use
  • Can generate Unique records
  •   option to allow NULL value in columns
  • option to generate (export) test data in SQL Script, XML,  CSV & JSON
  • Can insert data in Parent-child relationship maintain foreign key
  •   You can maintain the transaction  in the script
  •   capable enough to show different dependencies
  •   Preview data feature
  •    sampling is possible based upon the table

Although it is capable enough to generate millions of records easily I faced sometimes it is slow due to a different relationship.

I would recommend this tool if you want to try.

2. Redgate data generator tool

Redgate is another one of the famous tools available in the market.

Redgate_Test_Data_Generator

Below are some points which I like about the tool. This tool is not an open source tool. Although, you can try a free version.

  • You can generate (export) CSV
  • Easily maintain the transaction
  •   can generate rows in a batch
  •   Preview data feature is available
  •   can do sampling
  •   can use a regular expression
  •   A null value option is available
  •   a unique option is available

I like this tool as well but you need some time to understand it.

3. https://www.generatedata.com/

This is another interesting tool and a bit more advanced but simple.

generate_data_Test_Data

Below are the some features

  • Very easy to operate
  • can generate unique records
  • option to select data type like Names phone, city etc (user-friendly option)
  • Export is very advance  apart from regular export like SQL Script, XML, CSV, Excel, HTML this tool provides  generate code in JavaScript  & C# as well

Although, I didn’t find the option to maintain foreign key. In trial run you can generate at max 100 records so, you can try it easily.

4. https://www.mockaroo.com/

This is one of the advanced tools which I found so far. It gives you the various option of the data type.

mockaroo

mockaroo1

  • Easy to use
  • sampling is easy
  • the various option of data types as you can see in the above image
  • can export CSV, script, excel, Firebase etc
  • Preview data feature is available

You can generate 1000 records in the free trial. Although, I didn’t found relationship (parent-child) details in this.

I hope this might help you somewhere.

Enjoy learning and exploring new tools.

A simple way to check vulnerability status of your SQL SERVER database

As a product owner, you always worried about the different security aspect of your application and SQL Server Database is one of the main important parts for which you might worry.

And you always think there should be some kind of checklist which you or your team have to check whether your database is secure or not and find all the vulnerabilities.

And obviously you might have purchased different tools to this assessment as well who will provide you security loopholes but when we talk about Database the option is limited and some options are very costly.

With SQL SERVER 2017 latest  SQL Management Studio your one of the problem will be resolved cross-check your database vulnerability.

You heard it right. Although, this feature is already available in SQL Azure but now you can do this assessment of your database using SQL Server 2017’s  management studio.

This vulnerability assessment report can be generated on the database with few simple clicks and you will get different High, Medium , Low risks of your database.

The vulnerability assessment report not only provide risks details but also help you to identify which category  of it and this will not stop here you will get a recommendation as well to fix those problems. Sometimes , you will get direct scripts which you can run to fix those issues and sometimes you will get the links on how to implement those.

Let’s understand this by step by step action.

Before starting to make sure you have SQL Server 2017  Management  Studio’s latest version.

Step 1: Once you opened the SQL Server management studio right click on the database which you want to cross check.  in this example, I am using the AdventureWorks database. As shown in the below figure.

Indiandotnet_Vulnerability_Assessment_1

Here you have 2 options either Scan for Vulnerabilities or Open Existing Scan

Step 2: Now, as we are doing it the first time so click on Scan for Vulnerabilities option. and you will get the following screen where you can provide the location of scan file.

Indiandotnet_Vulnerability_Assessment_2

Step 3:-   Just click on OK button to proceed further and wow you will get all the loop holes of your database.

You can easily check what are different points on which your Database is failed with risk Assessment.

Indiandotnet_Vulnerability_Assessment_3

As shown in the above figure , we have 6 check points on which our database failed  in which 1 is on high risk , 3 medium risk  and 2 Low risk.

And if you see carefully there are different categories as well like data protection, Authentication and Authorization, Surface Area Reduction etc.

Here as the name suggest Data Protection is mostly related to encryption of your sensitive data like SSN, DOB etc or TDE.

Authentication and Authorization  is more relation to login access of the database.

Surface Area reduction  is more related to what extra option you have opened .

Step 4:- Now, move a step further and click on any row in the grid. You will find the details of the row just below the grid. As you can see in below image when we click on data protection it suggesting the column names which come under extra care and to on which we might think to apply encryption.

Indiandotnet_Vulnerability_Assessment_4

Step 5:-  The story does not end here, for some of the problems this assessment report provides script as well and if the script is not possible then provide a reference link to resolve that issue.

As you can see in below screen we are getting recommendation scripts to apply.

Indiandotnet_Vulnerability_Assessment_5

Isn’t it cool and simple to assess your database’s vulnerability in a few clicks and secure your database?

Share your thoughts.

Happy learning !

How easy to do a database Copy in SQL Azure?

Sometimes, you might require a copy of your database for some R&D purpose and there are various ways to achieve this.

If you are new to Azure SQL then you might think of those traditional ways which are good.
Let me share a simple command here which do the same task of a database copy.

CREATE DATABASE <New Database Name> AS COPY OF <Source Database>

Suppose, we have a database with the name Northwind and want to create a copy with name MyNorthwind in SQL Azure.
Now, to achieve this we have to write following command.

CREATE DATABASE MyNorthWind AS COPY OF NorthWind

I hope you might like this a quick and easy way and use it.

How easily you can unpivot the pivot data in SQL Server?

Pivot table indiandotnet

I know when we talk about the pivoting & unpivoting the data then most of the time we are making our faces and we feel it would be a tough task. Trust me after reading this post you feel unpivot is super easy.

Before jumping directly into unpivot want to share pivot link to take a glimpse if you are not aware of it.

Pivot in SQL Server pivot 

Now, let us assume that we have following table of employee with id,name,weekid and Dayname columns.

DECLARE @tblEmployeeDayWiseAttendace AS TABLE (Id INT IDENTITY(1,1),
EmployeeName VARCHAR(100),
WeekId SMALLINT,
Monday TINYINT,
Tuesday TINYINT,
Wednesday TINYINT,
Thursday TINYINT,
Friday TINYINT,
Saturday TINYINT,
Sunday TINYINT)

Now let’s insert few rows into it

INSERT INTO @tblEmployeeDayWiseAttendace (EmployeeName,WeekId,Monday,Tuesday,Wednesday,Thursday,Friday,Saturday,Sunday)
VALUES(‘Sandeep’,1,8,8,8,8,8,0,0),
(‘Sunil’,1,8,8,8,8,8,0,0),
(‘Shreya’,1,7,6,8,8,8,0,0),
(‘Shweta’,1,8,8,8,0,5,0,0),
(‘Priya’,1,8,8,8,8,8,8,0),
(‘Rashmi’,1,9,8,9,8,8,4,0),
(‘Bhushan’,1,4,8,5,8,2,0,0)

If you run SELECT * FROM @tblEmployeeDayWiseAttendace then you will get following data as shown in below snap.

Pivot table indiandotnet

Now, the challenge is to Convert Columns Monday,Tuesday,Wednesday and other day columns to row corresponding to employee and show their value.

To make it very easy you have to write below CROSS APPLY query

SELECT tmp.Id, tmp.EmployeeName,tmp.WeekId,tmp2.weekdayname,tmp2.weekValue
FROM @tblEmployeeDayWiseAttendace tmp
CROSS APPLY(values(‘Monday’,tmp.Monday),
(‘Tuesday’,tmp.Tuesday),
(‘Wednesday’,tmp.Wednesday),
(‘Thursday’,tmp.Thursday),
(‘Friday’,tmp.Friday),
(‘Saturday’,tmp.Saturday),
(‘Sunday’,tmp.Sunday))tmp2(WeekDayname,weekValue)

Once you run this query you will get the output which you require.

Now, tell me do you still afraid from unpivot.

Share your thoughts & inputs in comment.

Cheers!

RJ

Everywhere JSON so why not in SQL SERVER–New feature in SQL SERVER 2016

If you are a developer then surely you might have used JSON (JavaScript Object Notation) but, if not then don’t worry you might use sooner than later. JSON is kind of ecosystem which is most popular in the various area for exchanging the data. If you talk about charting solution, AJAX, Mobile services or any 3rd party integration then generally JSON is the first choice of the developers.


If you see nowadays most of the NOSQL database like Microsoft Azure Document DB, MONGODB etc. also using JSON ecosystem and some of them are based on JSON.


As it is such a popular growing system So, why not in SQL SERVER?

In SQL SERVER 2016 JSON introduced. This we can say a step or bridge between NON-relation database and relational database by Microsoft SQL SERVER


SQL Server 2016 providing following capabilities when you are using JSON

  1. Parse JSON by relation query
  2. Insert & update  JSON using query
  3. Store JSON in database


If you see it then conceptually it is similar to XML data type which you might use in SQL SERVER.

The good thing  in SQL SERVER 2016 for JSON there is no Native data type.  This will help in migration from any NOSQL to SQL SERVER.


SQL server provides bidirectional JSON formatting which you can utilize in a various way. Suppose data is coming from the external source in the JSON format then you can parse it and store in table structure (if required) in another case external source require data in JSON format while data in SQL SERVER in tabular format so both the purpose can easily solve with  SQL SERVER’s JSON feature.


Now, let’s jump directly to the practical to check JSON capabilities in SQL SERVER


1) FOR JSON AUTO

It is similar to  FOR XML AUTO.  It will return JSON object of selected column where column name is treated as a Key or in other words we can say it will format the query result in JSON.


JSON_Feature_Indiandotnet_1

when you run above command the result will be like as shown in below figure.

JSON_Feature_Indiandotnet_2


2) FOR JSON PATH: –

It’s exactly like JSON auto the only difference is instead of SQL SERVER we have full control over the format. JSON Auto take predefined column schema while with JSON path we can create a complex object.

For example, we are using AdventureWorks Sales order table and joining that with product table to get sub-node. If you see in below image we have added Root node as well. This root Node can be added in JSON auto as well if required.

JSON_Feature_Indiandotnet_3


Now, when you run the above query we can get complex JSON object as follows

JSON_Feature_Indiandotnet_4

3) IsJSON function:-

By the name, it is clear that this is a validating function.

To cross check whether the provided string is a valid JSON or not we can run ISJSON.

JSON_Feature_Indiandotnet_5


4) JSON_VALUE:-

  By the name, it is clear that if you want to get the value of the particular key of JSON then you can use this beautiful function which is JSON_VALUE.

JSON_Feature_Indiandotnet_6

5) OPENJSON function:-

This is a very beautiful function which you can use to parse external schema. Suppose, you got a JSON string from a mobile service which you will directly pass to SQL Sever and SQL SERVER stored procedure will do rest of the operation to parse it. The parsing and other operation can be easily handled by OPENJSON. The only tweak here that it required database compatibility level 130   which you need to do (if not compatible with level 130)

JSON_Feature_Indiandotnet_7


There are many other interesting things which we will cover later.

Please, provide your inputs.

RJ

ROW LEVEL Security SQL SERVER 2016

To understand RLS (ROW LEVEL SECURITY) let’s understand the different problems first.

Problem 1 Suppose, you have a Multi-tenant e-commerce website and different companies registered on your website and you have centralized single database for all the client. Now as a product owner it is your responsibility that one tenant’s data should not be available to another tenant.  This is a very common problem.

2. Now, Suppose you have hospital database in which you have login user of different doctors & nurses. Now, your challenge is to show data to doctor or nurses to their relevant patient to whom they are giving treatment, not any other patient data should be available .

Here, limiting the user’s access to only certain rows of the data in database many have various reasons like compliance standards, regulatory need or security reasons.

Now, I know you were thinking that all the above problem can be resolved at code side easily by writing custom logic. I will say here yes you are right but this is not the 100% solution.  For example, if you have 4 different application like web, mobile, console, windows (Excel) and all has their own DAL then you have to implement this custom logic to every application and suppose  tomorrow if any time a new 3rd party came which want to integrate your data  or access database directly then in such cases it is tuff to apply same logic.

So, all the above problem can be easily handle using SQL SERVER 2016’s feature which is ROW Level Security (RLS). Security is one of the key areas which is handled in SQL SERVER 2016 very seriously.  As RLS (Row Level Security) is centralized security logic so you don’t need to repeat same security logic again and again.

As the name suggested Security implemented at Row Level in SQL SERVER 2016. In the Row Level, Security data is access according to user roles. It is a centralized data access Logic.

RLS has following properties

  • Fine-grained access role ( control both read & write  access to specific rows)
  • Application transparency  ( No application changes required)
  • Centralized the access within the database
  • Easy to implement & maintain

How RLS works?

RLS   is a predicate based function which runs seamlessly every time when a SQL is run on particular table on which RLS  predicate function implemented.

There are 2 predicates  which can be implemented in RLS

1) Filter Predicate: – By the name, it is clear that it will filter the row or we can say exclude the rows which do not satisfy the predicate and stop further option like select, Update & Delete.

for example: Suppose, you want to restrict doctor to see other doctor’s patient data then in such case you can apply filter predicate.

2) Block Predicate: –  This predicate helps in implementing policy by which insert, update and delete rows will prevent which violate the filter predicate. In other words, we can say it explicitly block write operation.

For example, you have multi-tenant application and you want to restrict one tenant user to insert or update other tenant’s data. Or suppose you have sales representative who belongs to specific region so they can not insert , update or delete other region’s data.

Demo:-

I know you will be super excited to see the demo of this feature so. Let’s do it right away.

There are 2 basic steps to create RLS

a) Create inline table function  or we can say predicate function  and write custom logic to control user access to every row

b) create the security policy and apply it.

In this demo ,I am creating a  new table called Patients which has following schema.

RLS_Demo_Indiandotnet_1

Here, I have inserted 2 rows for Nurse1 & 2 rows for Nurse2

RLS_Demo_Indiandotnet_2

The objective is to show only those rows to Nurse1, Nurse2 in which they are the in charge and a doctor user can see entire table’s data.

To achieve this let first create 3 users  in database

RLS_Demo_Indiandotnet_3

Once the users are created the next step is to grant permission of select to Nurse1 & Nurse2 user and full permission to doctor user.

RLS_Demo_Indiandotnet_4

Now, before creating function it is a standard to create a security schema in our case we are creating a schema with name sec as shown in below figure.

Now, create a function which will have security logic. The Logic is very simple if the user is doctor Or any in charge name then return 1 else 0.

RLS_Demo_Indiandotnet_5

Now create a security policy to proceed further

RLS_Demo_Indiandotnet_6

Till now we are good to go. Now, let’s test the security policy.

Firstly, running the select query with default user “dbo.”  and we have not given permission for this user if you see fn_RLSPredicate we have not mentioned it so obviously the result would show “0” records.

RLS_Demo_Indiandotnet_7

Now, running the same select statement but executing with “Nurse1” login then you will find 2 records which are relevant to Nurse1 is visible.

RLS_Demo_Indiandotnet_8

Similarly, I am running the same statement for Nurse2 user by running command “Execute as user” so, again I will get 2 records

RLS_Demo_Indiandotnet_9

Now, running the same statement with Doctor user and as per our expectation, it should show all 4 records.

RLS_Demo_Indiandotnet_10

So, as you can see we have achieved the goal using RLS (Row Level Security) feature. Now, next thing which might occur in your mind how to disable this policy if required then doesn’t worry it is very simple. Just alter the security policy and make state = off as shown in below figure.

RLS_Demo_Indiandotnet_11

I hope till now we are good to work on RLS. In next couple of post, we will dig deeper in RLS.

Please, share your thought for RLS.

Isn’t it easy to mask your data with Dynamic data Masking #5

Data security is always one of the important points which can not be ignored. Nowadays if you are working for any specific domain like Banking or Healthcare then there are a lot of compliance rules which you have to follow.

Data Masking is one of the best ways to help you to secure your sensitive data by a dynamic mask encryption.

This is one of the best features of SQL SERVER 2016 which I personally like most.

With the help of Dynamic Data Masking, you are just applying a mask to your sensitive data.  for example, if your system is storing SSN data then it should be visible to privileged or we can say authorized user only.

Dynamic Data Masking has following features:-

1) It masked the Sensitive data.

2) There will be no impact on functions & Stored Procedures and other SQL statement after applying this.

3) Applying the Data Masking is super easy.

4) You can allow any database user/role to see unmasked data by just simple Grant & Revoke Statement .

5) Data is not physically changed.

6) It is just on the fly obfuscation of data query result .

7) It is just  a T-SQL command with basic syntax.

Now , let us understand how to implement it.

Data masking implementation is very easy and below is the syntax for it.

Masksyntax1

Here, if you see the syntax is very simple the only new thing is MASKED and with (function=function name) only.

The function is nothing but the way to mask the data. SQL SERVER 2016 has following  different functions to mask the data

1) Default() function:- This is basic masking with the help of this function you can easily mask any field.

for example, your first name or last name field can be masked like XXXX etc.

2) Email() function :- If your column is email type or you we can say if you store Email in your column then you should use the Email() function for masking.

for example, your email can be mask like  RXXXX@XXXX.com

3) Partial () function:- With the help of this function you can mask specific data length and exclude some part of data from masking logic. for example, 123-4567-789 is your phone number then with partial masking feature you can mask like 12X-XXXX-7XX.

4) Random() function – By the name it is clear that you can mask the data with any random number range we will see more below in the hands on.

Remove Masking :- This is also possible that you applied a masking to a column and later on you don’t want that masking. So , don’t worry it very easy to remove masking from a column. below is the syntax for same.

DropMask

Now, let’s understand this by an example.

In the example we are using a new database “SecureDataMask” in this database we are creating a tblSecureEmployee as shown in below figure.

Create_Table_Secure_Employee

Now, in this table, we are inserting couple of data for testing as shown below

Indiandotnet_Insert_Default_Row

Now we are applying different masking on this table’s column

1) Default Masking : In the table, we are applying default masking on LastName

Indiandotnet_Default_Masking

2) Email Masking :- In the table, we are going to apply Email masking to email column below is the syntax for it.

Indiandotnet_Apply_Email_Masking

3) Partial Masking:- For SSN we are going to apply custom masking. below is the syntax for same. Here as we aware that SSN is 11 characters long in our database. we applied the partial masking to show first two & last two characters in original value and rest other in the mask.

Indiandotnet_Partial_Masking_SQL_SERVER_2016

4) Random Number Masking :-  In our table, we are going to apply Random number masking to Securepin column as shown below.

Indiandotnet_Random_Number_Masking_SQL_SERVER_2016

Here, so far we are done with all the masking now.  let me run the select statement to test it.

Indiandotnet_Select_statement

If you see the data is still in the original state because I logged in using  privilege account “SA”. now, to test the masking let me create a new user account.

Indiandotnet_Create_Login_User_SQL_SERVER_

After creating the account we are trying to log-in with a new account as shown in below screen.

Indiandotnet_Login_With_New_User

After our successful log in, we will run the select statement on same database’s table as we did earlier. If you see below snap you will find that we got masked data for LastName, Email, SSN, and securePin.

Indiandotnet_Masked_Data_With_Less_Preivileged_account

Now, it might be a rare case but suppose you want to remove the mask from any column on which you applied masking then don’t worry it is super easy.

Suppose, from the same table we don’t want mask on the LastName then below is the syntax for same.

Indiandotnet_Removing_Mask_from_column_Sqlserver2016

Now, let me run the same select statement seeMask_user. You will find the Last Name is unmasked now.

Indiandotnet_Last_Name_Visible_

From above few changes you can secure your data via Dynamic masking and as mentioned above there will be no impact on your existing function ,stored procedure because data is not physically changed.

I hope you may like this feature.   Please, share your input for same.

Enjoy !!

RJ

The Evolution of DATEDIFFBIG in SQL SERVER 2016 #4

In the series of SQL SERVER 2016, this is a new post. in this post, we will discuss DATEDIFF_BIG and how it is helpful.

So, before jumping into directly in technical details, we all know that time is very important and every second valuable and countable but sometimes every microsecond & nanosecond is also countable Smile . For such operations in which every microsecond & nanosecond is countable, we can use DATEDIFF_BIG function.

As you aware the BIGINT range is from -9,223,372,036,854,775,808 to 9,223,372,036,854,775,807.  Here if any difference (Micro & Nano) second is out of the the mentioned range then DATEDIFF returns that value else return error(Obviously).

Below is the basic syntax if DATEDIFF_BIG although it is similar to DATEDIFF. We can say it is a extended version of DATEDIFF.

DATEDIFF_BIG( datePart, start Date, End date)

The value of datePart is same like DATEDIFF function.

For example if you want to collect millisecond difference then use ms, microsecond then mcs and for nanosecond ns.

As per the MSDN   for the Millisecond, the maximum difference between start date & end date is 24 days, 20 hours, 21 minutes and 23,647 seconds. For Second, the maximum difference is  68 years.  

Now, let see why this DATEDIFF_BIG introduced so, I am running a DATEDIFF  function in SQL SERVER 2012 and see what we get after running that query.


DATEDIFF_Function_Issue_Indiandotnet


You can see in above query we got an error of overflow.

Now, we are calculating the same difference from DATEDIFF_BIG in SQL SERVER 2016. See, below snap for same.


DATEDIFF_BIG_FUNCTION_INDIANDOTNET


Isn’t it great ? Although, I am scarred with those applications who calculate milliseconds Sad smile.

Anyways, it is good to know feature.

Do provide your feedback for the post it is very valuable for us.

RJ !!!

Here Comes New Idea of Split String in SQL SERVER 2016 #3

In the Series of SQL SERVER 2016, this is another post. Before Jumping in detail just think if you have a comma or other separator string and if you have to split it by separator field then for such task  in previous SQL SERVER versions either you will write a function which split the string and return desire values in a column  or

you will use XML function or  might be different custom functions.

Let me explain this with below example. Suppose you have a string like below

DECLARE @FriendList AS VARCHAR(1000)

SET @FriendList =’Ravi,Suyash,Vaibhav,Shyam,Pankaj,Rajul,Javed’


Now you want output like below

output_of


Then in such cases, you will  follow 2 approaches (their might be other as well)

Approach 1:- Write  a function like below  and use it.

Traditional_way_Split_String_Indiandotnet

And once this function is created you can use like below

use_of_Split_Function_in_SQL_Indiandotnet

Approach 2 :- You can use XML option in SQL SERVER as  shown in below

String_split_by_XML_SQL_SERVER

So, the good news is now in SQL SERVER 2016 you don’t need to write  so many lines to split any string. In SQL SERVER 2016 a new string function is Introduced which is

STRING_SPLIT

The use of this function is very easy and below is the syntax

STRING_SPLIT (string, separator)

Now, let me show you same output using STRING_SPLIT function

string_Split_Function_sql_server_2016_Indiandotnet

Isn’t it easy ?

I hope you will like this easy way to split the string.

Provide your feedback.

RJ !!!

Compress & Decompress–new Feature in SQL SERVER 2016 #2

This is another article in the series of SQL SERVER 2016 Journey . I am pretty much sure you might aware of Gzip Compression algorithm. If not then try  this link.


So, SQL SERVER 2016 introduce this two awesome functions for Compress & Decompress the data.

Before SQL SERVER 2016 version we have data compression feature like Page & Row compression (check Previous post for it Link )which is different then this column value compression.


In SQL SERVER 2016 Compress function,  data compression is done via GZIP algorithm and return VARBINARY(MAX).


Below is the simple syntax of Compress function


Compress (Expression)

Here Expression can be nvarchar(n), nvarchar(max), varchar(n), varchar(max), varbinary(n), varbinary(max), char(n), nchar(n), or binary(n)


Decompress function is just opposite of  compress function. It is used to decompress the value of VARBINARY which is converted using Compress function. The only tweak is you need to cast the output of Decompress function  in specific data type to make it readable (if using varchar ,nvarchar compression) .


below is the simple syntax of Decompress
Decompress (Compressed string)


Let’s understand this via an example as shown below .


Indiandotnet_Compress_Decompress_Feature_SQL

In this example I have taken 3 tables with exact same schema & data


  1. 1) IndiandotnetFriends
  2. 2) IndiandotnetFriends_Compress
  3. 3) IndiandotneFriends_Decompress


You can see  snap in which we are inserting same data.

As the name suggested in first table normal data from Adventureworks’s person table.

In second table we are inserting compressed value of first Name  and in 3rd table we are inserting decompress value of First Name from the Compressed table.

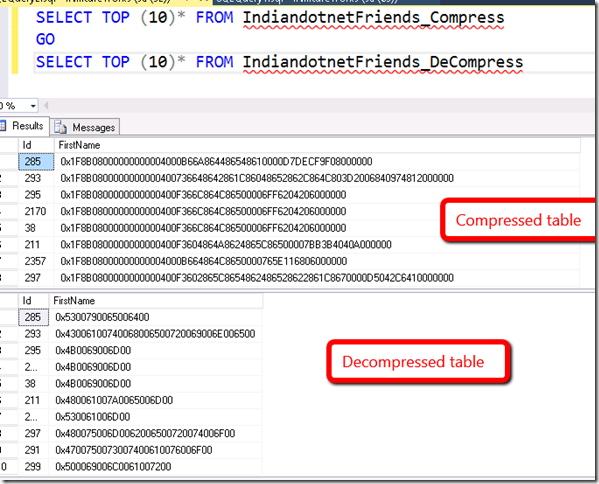
Now, let’s check compress  & decompress table data

Check_Compressed_Decompress_Datais


Now, Your might thinking that the output of both compress and decompress is not readable.

So you are right to make data readable of Decompress table we need to type cast.

See below snap for same.


Decompressed_value


Till now we know how to use this Compress & Decompress function. Now, let me share the benefit of using Compress. if you see below snap you will find that data length of compress is comparatively less than normal and decompressed data length .


DataLength_Indiandotnet


Obviously, compression helps you somewhere in the overall performance of your application.

The good point is  you can pass the compress data to your .net application and decompress using GzipStream as well.


The only thing which we need to take care is type casting. Suppose your base column which compressed is VARCHAR then you need to typecast again in VARCHAR.


Now, next question is where we can use this functions. So,  we can use in compressing large object like binary data in which we save jpg, pdf , word document etc..


I hope you will be excited in using this function.


Please, share your input.
RJ!