4 tools making your life easy by generating TEST Data Load

As developer /QA it is always a challenge to check the application on different parameters and Data Load is one of them.

Sometimes it is not easy to generate the load manually and we may skip this very important process to check our application on different data load which may cause extra pain to our end users, customers and to our team as well.

To avoid this either you yourself write some scripts (I will share an easy way to generate data load by SQL Script in near future) or use some outstanding tools available in the market.

In this post, I am going to share 4 best tools available in the market which I have used and my feedback according to my experience.

You can also try with trial versions and proceed further.

1. Apex SQL Data Generator:

Apex  SQL Data Generator is one the simple tool which I tried. It provides a free trial version for play.

Apex_Test_Data_Geneator

Below are some points which I like about this tool. This tool is not an open source but you can try this with the free version.

  • Easy to use
  • Can generate Unique records
  •   option to allow NULL value in columns
  • option to generate (export) test data in SQL Script, XML,  CSV & JSON
  • Can insert data in Parent-child relationship maintain foreign key
  •   You can maintain the transaction  in the script
  •   capable enough to show different dependencies
  •   Preview data feature
  •    sampling is possible based upon the table

Although it is capable enough to generate millions of records easily I faced sometimes it is slow due to a different relationship.

I would recommend this tool if you want to try.

2. Redgate data generator tool

Redgate is another one of the famous tools available in the market.

Redgate_Test_Data_Generator

Below are some points which I like about the tool. This tool is not an open source tool. Although, you can try a free version.

  • You can generate (export) CSV
  • Easily maintain the transaction
  •   can generate rows in a batch
  •   Preview data feature is available
  •   can do sampling
  •   can use a regular expression
  •   A null value option is available
  •   a unique option is available

I like this tool as well but you need some time to understand it.

3. https://www.generatedata.com/

This is another interesting tool and a bit more advanced but simple.

generate_data_Test_Data

Below are the some features

  • Very easy to operate
  • can generate unique records
  • option to select data type like Names phone, city etc (user-friendly option)
  • Export is very advance  apart from regular export like SQL Script, XML, CSV, Excel, HTML this tool provides  generate code in JavaScript  & C# as well

Although, I didn’t find the option to maintain foreign key. In trial run you can generate at max 100 records so, you can try it easily.

4. https://www.mockaroo.com/

This is one of the advanced tools which I found so far. It gives you the various option of the data type.

mockaroo

mockaroo1

  • Easy to use
  • sampling is easy
  • the various option of data types as you can see in the above image
  • can export CSV, script, excel, Firebase etc
  • Preview data feature is available

You can generate 1000 records in the free trial. Although, I didn’t found relationship (parent-child) details in this.

I hope this might help you somewhere.

Enjoy learning and exploring new tools.

The Evolution of DATEDIFFBIG in SQL SERVER 2016 #4

In the series of SQL SERVER 2016, this is a new post. in this post, we will discuss DATEDIFF_BIG and how it is helpful.

So, before jumping into directly in technical details, we all know that time is very important and every second valuable and countable but sometimes every microsecond & nanosecond is also countable Smile . For such operations in which every microsecond & nanosecond is countable, we can use DATEDIFF_BIG function.

As you aware the BIGINT range is from -9,223,372,036,854,775,808 to 9,223,372,036,854,775,807.  Here if any difference (Micro & Nano) second is out of the the mentioned range then DATEDIFF returns that value else return error(Obviously).

Below is the basic syntax if DATEDIFF_BIG although it is similar to DATEDIFF. We can say it is a extended version of DATEDIFF.

DATEDIFF_BIG( datePart, start Date, End date)

The value of datePart is same like DATEDIFF function.

For example if you want to collect millisecond difference then use ms, microsecond then mcs and for nanosecond ns.
As per the MSDN   for the Millisecond, the maximum difference between start date & end date is 24 days, 20 hours, 21 minutes and 23,647 seconds. For Second, the maximum difference is  68 years.  
Now, let see why this DATEDIFF_BIG introduced so, I am running a DATEDIFF  function in SQL SERVER 2012 and see what we get after running that query.


DATEDIFF_Function_Issue_Indiandotnet


You can see in above query we got an error of overflow.

Now, we are calculating the same difference from DATEDIFF_BIG in SQL SERVER 2016. See, below snap for same.


DATEDIFF_BIG_FUNCTION_INDIANDOTNET


Isn’t it great ? Although, I am scarred with those applications who calculate milliseconds Sad smile.

Anyways, it is good to know feature.

Do provide your feedback for the post it is very valuable for us.

RJ !!!

Unbelievable SQL SERVER 2016 Feature you should aware.


Although, I know I am bit late to share this thing on our blog but it says in Indian proverb “Der aai durust aai” means it’s OK you came late but you came that is more important.

Anyways, so you all might aware that Microsoft launched SQL SERVER 2016 officially in June 2016.

You can download the SQL Server 2016 via Link.

Obviously, this is a new revolution in SQL SERVER series. You will find many great features in this version.

This post is beginning to explore all those great features and we will do deep dive in all those features. In this, post we briefly introducing those features. so, without wasting time let me share a brief introduction.


1) JSON in SQL SERVER :-

Is this surprising to you ? Obviously, yes. As you might aware that most of the NO SQL database use either JSON or XML. As XML feature already exists in SQL SERVER so this was time for JSON. You can play with JSON in SQL SERVER 2016.


2)Always Encrypted :-

If you talk about security this one the best feature. Now, you are thinking what it means. So, It means that the data in the SQL SERVER reside always in encrypted format and SQL server can perform the operation on the encrypted data without decrypting it. The encryption key can be exist in some other system. With this, feature you can secure you ensure that your data is secure from the person like DBA / Developer as well. These guys also can’t see the actual data. Isn’t it neat ?


3) Row Level Security :-

This is another interesting feature which helpful especially to the developers  who needs to write extra code to check this. Let me explain this with an example suppose you have a sales team who do market research and you want to restrict that each sales manager can see only those data which entered by him only in such cases you don’t need to write specific condition in your code. It can be achieved by Row Level Security.


4) “R” in SQL SERVER :-

For the data scientist, it is a great NEWS. As Resolution Analytics is purchased by Microsoft and It is incorporated in SQL SERVER. You can run R analysis query in SQL Server.


5) Temporal Table:-

The Temporal table holds the old version of ROWS of a table. It means that it maintain a copy of the old rows in the table whenever there is an update on the main table.


6) PolyBase :-

With the help of this feature, you can access data which exist in Azure Blob or Hadoop cluster using the same SQL server. In the nutshell, we can say this is the technology which combines both relational & non-relational database in a single umbrella which is SQL SERVER. You can run the query directly on external data like Hadoop or Azure blob storage.


7) Stretch Database:-

I am pretty much sure by the name you can guess this feature. So, with the Stretch database you have can store your part of the data in the cloud which depends upon your need. You can say most recent transactional data you can store in your local environment and other old data you can store in Azure.


8)Query store :-

Another interesting feature to help you in identifying  performance drag using Query store. When you enable this feature it automatically captures a history of queries , plans,  and statics and retain them for review and resolve the performance issues.


9) Mobile report:-

As mentioned earlier this is the revolution in SQL SERVER 2016. In SSRS there are many important changes introduced. Now we can import Power BI report in SSRS and apart from this you can create a mobile report which you can run on Mobile.


Now, we started officially SQL SERVER 2016 tutorial series.


Moving forward we are going to discuss all these features in details and also the couple of new things which introduced in SQL SERVER 2016.


enjoy.

Happy VijayDashmi.

Why Do People Think Learn Step by Step PIVOT Transformation is a Good Idea ? TIP #125

In the series of step by step SSIS learning, this is another interesting article. In this article we will try to implement PIVOT transformation in few easy steps.

Let’s understand the PIVOT by below example. Suppose, you have a salary data of employee as shown below.

Employee Name Salary($) Year
Sandeep 110000 2016
Sunil 120000 2016
Shreya 130000 2015
Virendra 140000 2015
Sandeep 120000 2014
Sunil 130000 2014

Now, if our requirement is something like below table then we would require PIVOT functionality.

Employee Name 2016 2015 2014
Sandeep 110000 0 120000
Sunil 120000 0 130000
Shreya 0 130000 0
Virendra 0 140000 0

In general, we say when we want to convert Rows data to Columns then this is called Pivoting.

Now, lets create a sample of PIVOT transformation with few basic steps. In this example, we are again using AdventureWorks database. EmployeePayHistory, Employee, People tables are base of our example. We wrote query which fetch data similar as shown above.

4

Let’s move step by step

Step 1: Add a dtsx package and drag drop data flow task as show in below figure.

1

Step 2:- Now, double click on Data flow task and drag drop data source and select SQL Data source and configure the SQL statement as shown below.

2

3

Step 3:- Now, We have to drag drop PIVOT transformation control as shown below.

5

Step 4:- Now, we have to configure the  PIVOT control. When you choose edit option then you will get the following screen.

Here, we have to choose Pivot Key, Pivot Value and Set Key.  In the Pivot Value we use the value which we have to show in the columns.


15

If you see pivoted output columns highlighted in yellow in above image is the year wise columns. if you are sure for the columns which you want as a pivot columns then you can add the name of the columns in place of [value1],[value2] etc. and click on Generate Columns Now button. (In current case we have limited years so we have added [1997] to [2004] values in this textbox and clicked on Generated Columns Now button due to which we got yellow required Pivot output columns as highlighted yellow.

Step 5:- Our configuration is not yet complete to configure this we have to click on advance setting and select Input and output properties.

Here, if you want to add any extra column as an output column which exist in Input columns  then you have to select Pivot Default Output and click on add column. Now, the main important point if we want to map it with existing input source column then in such case we have to add LineageId of that particular column.(AS highlighted in below images)

7

8

Step 6:- The another most important point is PivotUsage which is highlighted below. If we want to add columns which are not affecting the pivot then we have to update the value of PivotUsage to 0.

9

Step 7:- Once the Pivot is configure the next step is to provide the output of pivot to a destination. As a destination we are using Excel file as usual Smile.

So, drag drop excel destination source and configure it as shown in below figure .I hope you will not face any issue in this. If you are new and facing any difficulties then please visit previous articles of Zero to Hero in SSIS Series

10

11

Step 8 :- Once the configuration is done we will see below screen.

12

Step 9:- Now, once everything is completed then we run the package and we will get following screen.

13

Now to cross check we open the excel and cross check the data. When we open the excel, we found desire result.

14 

So, We have achieved what we want. We did our first Pivot Transformation example.

Please, feel to drop your comment.

Enjoy !!!

RJ!!!

Step by Step SSIS Multicast Transformation TIP #121

Dear Friends,

This is another post in the series of step by step SSIS ,Zero to hero series. In this post we will discuss another transformation control which is Multicast transformation.

Multicast is a way which help us to provide multiple copy of same source data for different transformation. Or in other words we can say multicast transformation create multiple pipelines for the same data.

Lets understand this by an example. Suppose, we are product developer and selling product in different state in India. Now ,the problem is same product may have different selling price due to different tax system. So, we have to use same data of product but there will be different discount according to sate tax.

Now, here we go step by step. for your information in this example we are going to use similar example which we did in last post of Derived column Transformation tip #120

Step 1:- Add a package and drag drop data flow task and configure source database. I am taking Adventurework2012 database and using product &  productCategory tables for source data query below is simple snap of data

Data1

Step 2:- Once the data is configured. Drag drop Multicast control  as shown in below figure and give output of source object to Multicast and try to configure it.

DragDropMulticast

Step 3:- Now, when we have configured Multicast we can get multiple output from Multicast control. Suppose , One state is taking 10% WAT tax, another state taking 20% WAT tax and last one is taking no tax (wow that’s great). So we can drag drop derived column and configure then according to 10% ,20% WAT tax for reference you can take a look of tip #120 

I configured the the 3 different output in same way and adding the respective flat files. As shown in below figure you will see we added 3 files

1) with 10% ,with 20 % and without and tax

FileDestination

After configuration you will get structure something like as shown in below image. As a result we will get 3 flat files with 10% ,20% and without any change.

finalDesign

Step 4:- If you face any difficulty in Derived column configuration and moving the data to file please follow earlier post. Now once everything is configured run the package by pressing F5 or hitting run button you will get following screen. So , if you see Multicast providing similar row count to different output which is 295 rows.

Final_Result

We , can use this Multicast where we need multiple copy of same source data.

I hope this article might help you somewhere.

Enjoy !!!

RJ !!

Step by Step SSIS–Union ALL Tip # 119


Dear All,

In the series of  zero to hero SSIS series this is one of the simplest transformation control which known as UNION ALL. 

As you might aware UNION in general term  which means collective. In SSIS UNION all control is doing the same task.

It collect all the inputs may be of same type of sources or different type of sources and  union them all and provides single output for the same.

Lets understand this by below example.

Suppose, We have different text files which contain fruits &  vegetables name. Now our aim is to combine all the fruits and vegetables name which exists in these files.

if you see below image you will find 3 files which FruitA (Contains fruit names start with letter A) , FruitB (Contain fruit names start with  letter B), FruitP (contains fruit name start with letter P)

Files Now we need to combine this file using UNION ALL transformation. So follow below step by step

1) Step 1:- Step 1 is simplest step and now you all well versed in this. We need to add a new SSIS package file and drag drop  data flow task .

2) Step 2:- Now add different flat file source for all the 3 files and configure all the 3 files  fruitA.txt, fruitB.txt , fruitP.txt .

3) Once we configured all the 3 flat file sources, We have to drag drop UNION ALL transformation control.Once we drag drop UNION ALL we can provide the output of all the 3 files as a input in UNION ALL control as shown in below  figure.

source

Step 4:- Now, we have to configure the UNION ALL control. To do this right click on UNION ALL control and click on EDIT option. Here we have to configure all the columns which we need to union.

ConfigureUnionAll

Step 5:- Once the UNION ALL is configured our next step is to get the output of UNION ALL in a resultant file. for this we have to drag drop destination flat file control as shown in below figure.

file

Step 6:- Now we have to configure the flat file destination and save it to specific location. A part from this we have to provide input to flat file destination which will be output of UNION ALL control. As shown in below figure I am saving the file on same location and giving name finaloutput.txt

finaloutput

Step 7:- Once all the above step is processed by us the final step is to run the package for this just click on RUN icon or hit F5. If everything is working fine the we will get following  result with all the green right check images.

finaloutputREsult

If you see above image we did union of all the 3 files and saved output in a single file.

Now, for learning purpose and to make the post simplest I use only same type source you can use different type of source and destination as per your need.

A part from this UNION ALL doesn’t remove duplicate so if there are duplicates in the files it will not remove.

I hope this article will help you somewhere.  Please provide your inputs.

Enjoy !!!

RJ!!!

Step by Step SSIS learning What Data Conversion use in SSIS ? TIP#116

Dear Friends,

In the series of step by step learning of SSIS this is part #6 in which we are going to learn a new control Data Conversion.  I am sure by the name it clear that this control will be use when we require data type conversion of input columns then we need this control. This is exactly same like CONVERT  or CAST  in our programming.

Although, Here it would be important to share SSIS also have data type which are similar to other programming or database’s data types

Like DT_NUMERIC is equivalent to numeric data type, DT_I2 is equivalent to smallint, DT_str is equivalent to VARCHAR and so on.

I am sure you will find this control fairly simple so without wasting much time lets start step by step.

For a change I am using excel data source here.

Suppose, we have an excel of sales order which have columns like sales order, subtotal,Tax amount, and freight.

SaleOrderExcel

Here sales order is varchar, while SubTotal , Tax amount & Freight are numeric with decimal 4 places. We want to convert the numeric field in integer and want result in a flat file. so let’s start.

Step1 :- Drag drop a Data flow Task control and double click it. Now add an excel data source from SSIS tool bar as shown in below figure.

ExcelSource

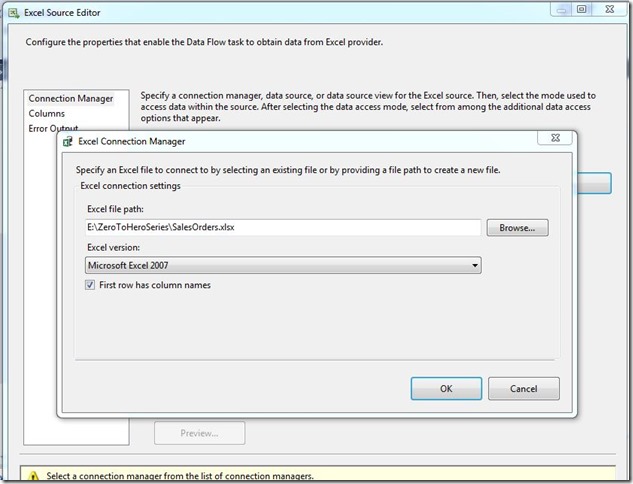
Step 2:- Now next step is to configure this excel source. so to do this just right click and use EDIT option. You will get a screen where you need to provide the file which we want to access.

ExcelSourceStep2

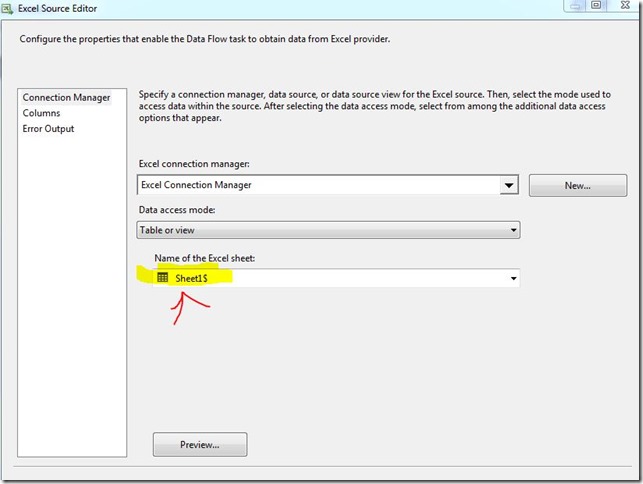
Once the connection with excel is established the Next very important step is to configure sheet as highlighted in below figure. remember you need to configure this sheet because an excel may have number of sheets available so you need to assign proper sheet whose data you want to process.

ExcelSource3

Step 3: Once the sheet is configured you can choose the columns as well which you want to process or want in destination by click column’s option in as shown in below figure

ExcelSourceColumn

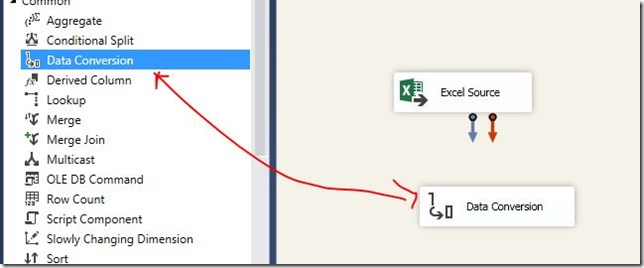
Step 4:- Now drag drop the data conversion control from SSIS toolbar

dataConvrsionControl

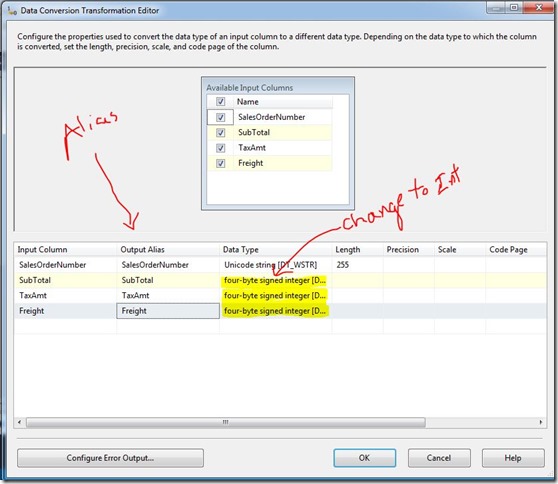
Step 5:- Now , open context menu and click edit button to configure data conversion. Now remember here we have to change data from numeric to integer (As discussed earlier our aim). so just change the desire data type which is integer (DT_I4) of all the three numeric data type. As shown in below figure. Also , point to remember here if when you do data type conversion you need to careful about Aliasing also. You will see copy of as a prefix on column.

Convesion

Step 6:- Now, we need this output in flat file so adding a file destination control from SSIS toolbox and configuring it by clicking Edit button as shown in below figure.

FlatFile

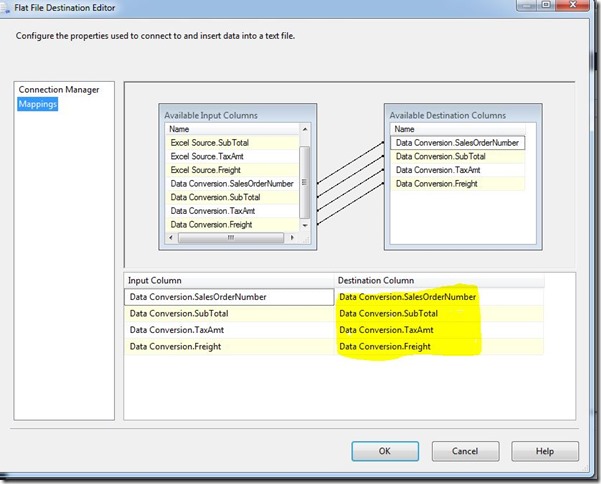
Step 7:- In next step we have to configure the file location and columns which we require in the flat file. And delete unnecessary columns which are not required.

deleteAccesscolumns

dataConvesionmapping

Step 8 : Once the above step is done, we are good to go to run this package. So,hold your breath for few second and hit F5 Smile .

You will get find below screen. Which shows that all the provided rows are inserted in file. 

result

Step 9 : To cross check whether file has integer columns or not lets open it.

CSVREsult

So, if you see above screen we did it successfully. So we achieved our goal in this post and used DATA conversion control successfully.

I hope you feel this post useful.

Thanks for reading this post.

Enjoy !!!

RJ

A simple way for consistency TIP #106


Whenever we develop application of maintain application we define sets of rules or policies  like naming convention , data type, database & SQL SERVER properties (like which property should be unable or disable)  but the problem is to cross check or to enforce these properties is very tedious.

To enforce the policies SQL SERVER provided a great feature which is Policy Based Management.  This is the feature which helps you to not only write the policies or rules but also enforce and cross check whether those rules or policies is followed in your environment or not.

Although these feature is mainly for A DBA but I think it is good for a everyone who love SQL Server.

Now let me share an example which will help us to better understand Policy Based Management.

So to begin with  firstly we have to open the Policy Based Management’s interface. Which we can get in Management folder in SQL SERVER’s object explore window. (You can see below yellow highlighted)

1

So when you expand the Policy Management in Management feature  You will see 3 different folders which are facets , condition and policies.

So there are  around 84 in build facets which is basically properties for different conditions.

Conditions are basically simple check applied using facets.

Policies are created on condition which will enforce once it created.

Below I am creating policy to check table who has row count =0 (Little bit odd) .You can try with stored procedure name not started with sp_ (will be good start as well).

So , Now create a simple condition by right click and choosing menu New condition

2

You will get following screen just add condition

3

We are creating a simple condition which will check the table which has RowCount is 0.

11

Once you created this condition you will get condition in conditions folder.

4

Now once condition is created we have to create policy. To create policy we have to right click on policy and select new policy.

5

When you click the new policy you will get following screen

6

Now we can add check Condition which we have created as shown in below figure. We can apply policy against target Like in below snap we want policy against every table for IndiandotnetDB

NewPolicy

We can set evaluation mode according to our need.

Once you saved the policy we can run it any time.

We can evaluate policy by right click Evaluate as shown in below figure

9

When we run the policy we will get following result

10

So , If you see above highlighted row which means a table contain  Row Count.

I hope with above steps you understand a basic way to create Policy Base Management concept.

Policy based management is surely a great tool to manage  database.

Please feel free to give a chance whether you are DBA or not.

Enjoy PBM !!

Happy learning !!

RJ

Merge statement- A simple way for DML TIP#105

When, I first saw this statement a Hindi proverb  come to my mind which is “1 teer 2 nishane” . The meaning of this proverb means a single bow which hit two different aim in one shot.

So let me explain “Merge” statement in more detail. With the help of this Merge statement we can do insert ,update and delete with a single statement.

Let’s understand this by an example. Suppose we have two tables Source and Target as shown in below figure

Source_And_Target_1

Now these tables will have some data so lets write query to insert some pre pop data

insert_data

Now what we want follow things

1) if  employeeId of source and target tables are not matched and if employee name starts with “S” in the source table  then insert the value in target table.  (means insert Sunil & steve’s records from source to destination table)

2) If employeeId of source and target tables are matched then update the Employee name from source table to target table  (if any record matched then update the employee name which not the case with current data)

3) If employeeId of source and target tables are not matched and Employee name in target table starts with “S” then delete that row from target table. (So Sunidhi’s row will be deleted from target table)

Let’s write Merge Statement  for all the 3 above work.


Indiandotnet_Merge

Now you observed that there is one more statements which is written explicitly apart from the condition which is OUTPUT clause which helps us to determine what operation is performed.

When you run this you will get following output

Operations_Merege

Now see the actual data in both the table.

ActualData_Merege


So, a simple merge statement is doing all 3 operations like update, insert ,delete.

I hope this tip will help you some where.

Enjoy !!

RJ!!!

Proper Aliasing will help you somewhere TIP#104

Recently, When we were delivering session on “SQL SERVER” one of the persons asked why we require Aliasing so I thought this might be question in everyone’s mind.

So lets start with couple of well know statements then we will see the actual problem where we need it explicitly.

There are two type of aliasing we can do a column aliasing & table aliasing.

Aliasing might help you in readability of stored procedure or function. It helps when you retrieving any calculated or derived column which need in your application so lets starts with some example.

if you see below example we are calculating a column but it does not have column name so fetch this specific value is very difficult so we require column Aliasing here

Calculated_Column

So as you saw above figure the calculated column is with name “No column name” we can not retrieve it easily so we require aliasing

Total_Price

Now ,lets talk about the table aliasing. So table aliasing help you in readability and it is helpful when you require self join or same table is required in join.

Lets see in below example we did a self join and we required aliasing

SelfJoin

The aliasing will be helpful when same table join is required multiple times.

I hope this tip might helpful to someone.

I would appreciate if you provide you inputs as well where we can utilize aliasing.

Enjoy!!!

Th

RJ!!!